IAM Least Privilege: Auditing & Right-Sizing Permissions with iamlive and Policy Sentry

Your application doesn't needs3:*onResource: "*". It needss3:GetObjecton one bucket. Here's how to find out exactly what it needs — automatically — and deploy a bulletproof policy in under an hour.
If I had a dollar for every IAM policy I've seen with Action: "*" and Resource: "*", I could fund Anthropic's next training run.
The pattern is always the same. A developer is building a feature. They need S3 access. The first attempt fails with AccessDenied. They add s3:*. It works. They move on. Three years later, that role has permissions to delete the entire account, and nobody remembers why.
This isn't a laziness problem — it's a tooling problem. Manually crafting least-privilege IAM policies is genuinely painful. AWS has over 17,000 individual IAM actions across 300+ services. Even experienced engineers struggle to identify the exact actions their application needs.
In this post, I'll show you how to automate the entire journey from "I have no idea what permissions my app needs" to "here's a production-ready, least-privilege IAM policy deployed via Terraform" — using three open-source tools and a pipeline that costs $0.
The Toolkit
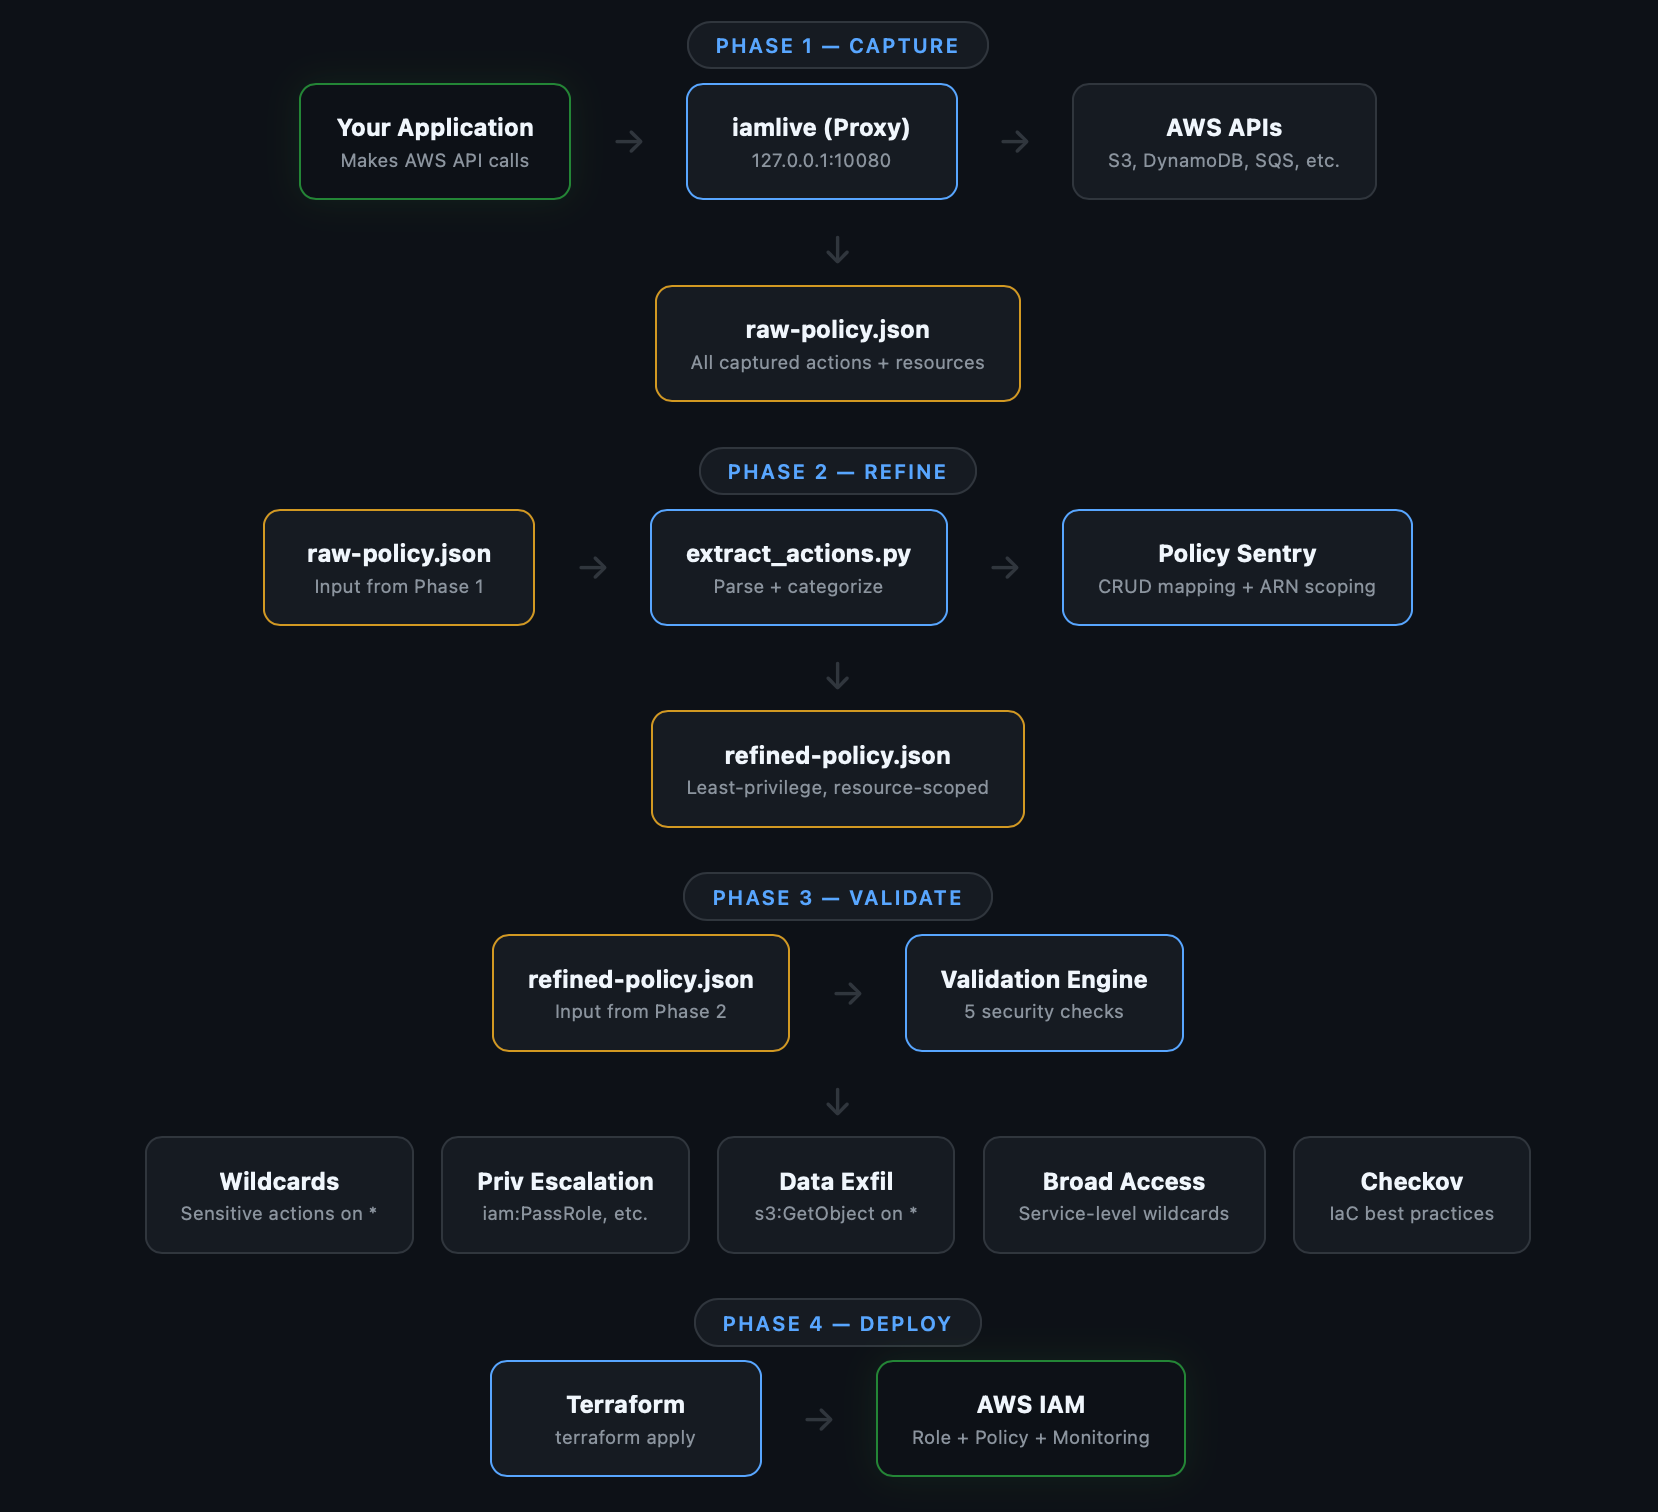
We're combining three open-source tools into a four-phase pipeline:
iamlive — A local proxy that intercepts your application's AWS API calls and records exactly which IAM actions are used. Think of it as a packet capture, but for IAM permissions.
Policy Sentry — Built by Salesforce's security team, this tool maps IAM actions to CRUD access levels and generates policies scoped to specific resource ARNs. It knows which actions support resource-level constraints and which ones don't.
Checkov — An infrastructure-as-code scanner that catches security misconfigurations. We use it to validate the generated policy before deployment.
Why Not Just Use AWS Access Analyzer?
AWS IAM Access Analyzer is great for ongoing audits, but it has limitations for policy generation:
- It relies on CloudTrail logs, which means you need 30-90 days of historical data before it can generate a policy. Our approach gives you a policy after a single test run.
- It provides basic resource scoping. Policy Sentry maps actions to CRUD access levels with fine-grained ARN constraints.
- It has no CI/CD integration. Our pipeline validates policies on every PR with GitHub Actions.
- It requires the AWS Console. Our toolkit runs entirely from the command line.
My recommendation: Use both. This toolkit for development-time policy generation. Access Analyzer for ongoing production audits.
Prerequisites
bash
# Python 3.9+
python3 --version

# Go 1.16+ (for iamlive)
go version

# Terraform 1.0+
terraform version

# AWS CLI configured
aws sts get-caller-identity
Phase 1: Capture — Record What Your App Actually Does
This is the core insight: stop guessing what permissions your app needs and just record them.
iamlive runs as a local HTTP proxy. Your application's AWS SDK calls route through it. iamlive records every API action and (in proxy mode) the resource ARNs being accessed.
Install iamlive
bash
# Homebrew
brew install iann0036/iamlive/iamlive

# Or via Go
go install github.com/iann0036/iamlive@latest
Start Capturing
Terminal 1 — Start the proxy:
bash
iamlive --mode proxy \
        --output-file captured-policy.json \
        --sort-alphabetical \
        --force-wildcard-resource \
        --refresh-rate 1
Terminal 2 — Run your application:
bash
export HTTP_PROXY=http://127.0.0.1:10080
export HTTPS_PROXY=http://127.0.0.1:10080
export AWS_CA_BUNDLE=~/.iamlive/ca.pem

# Now run your app normally
python3 my_app.py
# or
./my-service
# or
node index.js
While your application runs, iamlive displays captured actions in real-time:
[iamlive] s3:ListBucket
[iamlive] s3:GetObject
[iamlive] dynamodb:GetItem
[iamlive] dynamodb:PutItem
[iamlive] dynamodb:Query
[iamlive] sqs:SendMessage
[iamlive] sqs:ReceiveMessage
[iamlive] ssm:GetParameter
[iamlive] logs:CreateLogStream
[iamlive] logs:PutLogEvents
When your app has exercised its full functionality, press Ctrl+C. iamlive writes the captured policy to captured-policy.json:
json
{
  "Version": "2012-10-17",
  "Statement": [
    {
      "Effect": "Allow",
      "Action": [
        "dynamodb:GetItem",
        "dynamodb:PutItem",
        "dynamodb:Query",
        "logs:CreateLogStream",
        "logs:PutLogEvents",
        "s3:GetObject",
        "s3:ListBucket",
        "sqs:ReceiveMessage",
        "sqs:SendMessage",
        "ssm:GetParameter"
      ],
      "Resource": "*"
    }
  ]
}
This is already a huge improvement — 10 specific actions instead of 5 service-level wildcards. But the Resource: "*" still makes it broader than necessary. That's what Phase 2 fixes.
Proxy Mode vs CSM Mode
iamlive supports two capture modes:
| Proxy Mode | CSM Mode | |
|---|---|---|
| Captures actions | Yes | Yes |
| Captures resource ARNs | Yes | No |
| Setup | Set HTTP_PROXY + CA cert | Set AWS_CSM env vars |
| Compatibility | All AWS SDKs | AWS SDK + CLI only |
| Best for | Production policy generation | Quick exploration |
Always use Proxy mode for actual policy generation. CSM mode is fine for a quick "what does this script call?" check, but it misses resource information.
Pro Tips for Capture
Exercise all code paths. Run your app through its full lifecycle — startup, normal operation, edge cases, shutdown. If there's a weekly batch job or error handling path that calls different APIs, trigger those too. Missing an action here means the generated policy will be too restrictive.
Capture in staging, not production. Run against a staging environment with representative data. The API calls will be identical to production, but you won't risk impacting real users during the capture.
Run multiple sessions. If your app has different operational modes, run iamlive multiple times and merge the policies. The toolkit handles deduplication automatically.
Phase 2: Refine — Scope Permissions to Specific Resources
The captured policy tells us what our app does. Phase 2 answers where it does it — scoping each action to specific resource ARNs.
Install Policy Sentry
bash
pip3 install --user policy_sentryExtract and Categorize Actions
The toolkit includes a script that parses the iamlive output and generates Policy Sentry templates:
bash
python3 scripts/extract_actions.py captured-policy.json \
    --app-name my-app \
    --output-dir policies/refined/
Output:
==================================================
 Extracted 10 unique actions from 5 services
==================================================

  dynamodb (3 actions)
    - dynamodb:GetItem
    - dynamodb:PutItem
    - dynamodb:Query
  logs (2 actions)
    - logs:CreateLogStream
    - logs:PutLogEvents
  s3 (2 actions)
    - s3:GetObject
    - s3:ListBucket
  sqs (2 actions)
    - sqs:ReceiveMessage
    - sqs:SendMessage
  ssm (1 actions)
    - ssm:GetParameter
It also generates a CRUD template — this is where the magic happens:
yaml
# policies/refined/my-app-crud-template.yml
mode: crud
name: MyAppRole
description: 'Least-privilege policy for my-app'

read:
  - 'arn:aws:s3:::my-app-data/*'
  - 'arn:aws:dynamodb:us-east-1:123456789012:table/users'
  - 'arn:aws:ssm:us-east-1:123456789012:parameter/my-app/*'

write:
  - 'arn:aws:s3:::my-app-uploads/*'
  - 'arn:aws:dynamodb:us-east-1:123456789012:table/users'
  - 'arn:aws:sqs:us-east-1:123456789012:my-app-queue'
  - 'arn:aws:logs:us-east-1:123456789012:log-group:/my-app:*'

list:
  - 'arn:aws:s3:::my-app-data'

exclude-actions:
  - 's3:DeleteBucket'
  - 'iam:CreateUser'
Edit this file with your actual resource ARNs. This is the one manual step in the pipeline, and it's the most important — it's where you define the boundaries of what your application should access.
Generate the Refined Policy
bash
policy_sentry write-policy --input-file policies/refined/my-app-crud-template.yml \
    > policies/refined/my-app-refined-policy.json
Policy Sentry consults its IAM database (compiled from AWS documentation) and generates a policy with:
- Only the IAM actions needed for each access level on each resource
- Resource ARNs scoped to exactly what you specified
- No dangerous actions that you excluded
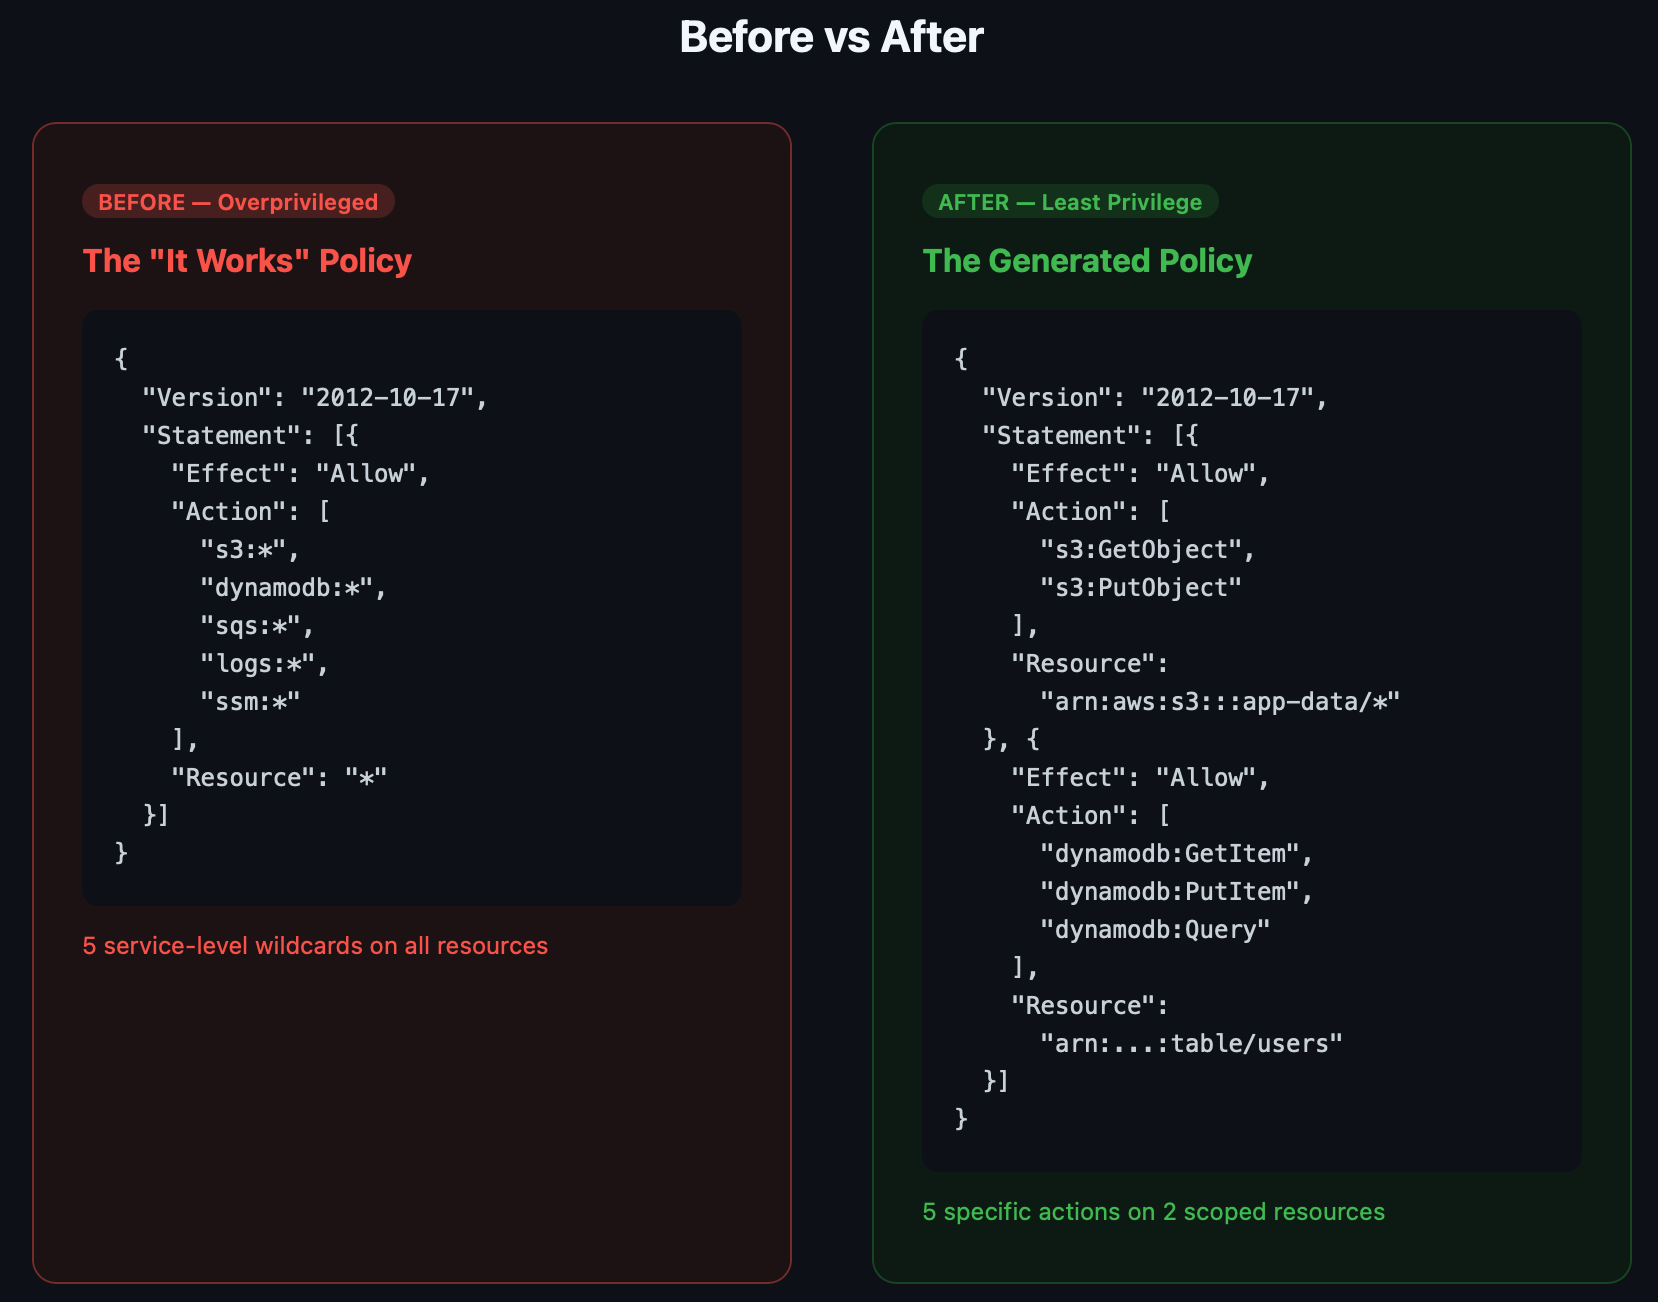
The difference is dramatic. Instead of 5 service-level wildcards on *, you get specific actions scoped to specific resources:
Before (what most teams deploy):
json
{
  "Action": ["s3:*", "dynamodb:*", "sqs:*", "logs:*", "ssm:*"],
  "Resource": "*"
}
After (what the toolkit generates):
json
{
  "Statement": [
    {
      "Action": ["s3:GetObject", "s3:PutObject"],
      "Resource": "arn:aws:s3:::my-app-data/*"
    },
    {
      "Action": ["dynamodb:GetItem", "dynamodb:PutItem", "dynamodb:Query"],
      "Resource": "arn:aws:dynamodb:us-east-1:123456789012:table/users"
    },
    {
      "Action": ["sqs:SendMessage", "sqs:ReceiveMessage"],
      "Resource": "arn:aws:sqs:us-east-1:123456789012:my-app-queue"
    }
  ]
}
Same application. Same functionality. Fraction of the blast radius.
Phase 3: Validate — Catch What Shouldn't Ship
A refined policy is better than a wildcard policy, but it's not automatically safe. Phase 3 runs five security checks to catch issues before deployment.
bash
./scripts/validate.sh --input policies/refined/my-app-refined-policy.jsonWhat It Checks
1. Wildcard Resources on Sensitive Actions Flags actions like iam:PassRole, sts:AssumeRole, or lambda:UpdateFunctionCode that still have Resource: "*". These are privilege escalation enablers that should always be scoped.
2. Privilege Escalation Paths Detects known escalation patterns — 17 action combinations that could let an attacker elevate their access. Examples: iam:CreatePolicyVersion, iam:AttachRolePolicy, lambda:UpdateFunctionCode + iam:PassRole.
3. Data Exfiltration Risks Warns if data-access actions like s3:GetObject, ssm:GetParameter, or secretsmanager:GetSecretValue target wildcard resources. An attacker with s3:GetObject on * can read every bucket in your account.
4. Overly Broad Service Access Catches any remaining service-level wildcards like ec2:* or iam:* that should have been refined in Phase 2.
5. Checkov IaC Checks Runs Checkov's IAM-specific rules against a temporary Terraform wrapper to catch known misconfiguration patterns.
Example Output
============================================
 Phase 3: Validate — Security Checks
============================================

[1/5] Checking for wildcard resources on sensitive actions...
  ✓ No dangerous wildcard patterns found

[2/5] Checking for privilege escalation paths...
  ✓ No privilege escalation patterns detected

[3/5] Checking for data exfiltration risks...
  ✓ No data exfiltration risks detected

[4/5] Checking for overly broad service access...
  ✓ No overly broad service access detected

[5/5] Running Checkov IAM checks...
  ✓ Checkov found no IAM issues

============================================
 VALIDATION PASSED
 No issues found
============================================
If validation fails, the script exits with a non-zero code — meaning you can gate deployments and PR merges on a clean validation.
Phase 4: Deploy — Ship It with Terraform
The final phase deploys the validated policy and creates an IAM role in AWS:
bash
cd terraform/

terraform init
terraform plan \
    -var="policy_file=../policies/refined/my-app-refined-policy.json" \
    -var="role_name=MyAppRole" \
    -var="trusted_services=[\"lambda.amazonaws.com\"]"

terraform apply
What Gets Created
- IAM Role with a configurable trust policy (Lambda, ECS, EC2 — whatever needs to assume it)
- IAM Policy from your refined JSON, attached to the role
- Tags showing the policy source (
iamlive-policy-sentry) for traceability - Optional: CloudWatch Alarm that triggers when the role receives
AccessDeniederrors
That last one is particularly useful during rollout. Enable it to detect if the policy is too restrictive:
hcl
terraform apply \
    -var="policy_file=../policies/refined/my-app-refined-policy.json" \
    -var="role_name=MyAppRole" \
    -var="enable_access_denied_monitoring=true" \
    -var="access_denied_threshold=5"
If the alarm fires, you know you missed an API call in Phase 1. Re-run the capture, add the missing action, validate, and redeploy.
One Command: The Full Pipeline
For teams that want the end-to-end flow:
bash
./scripts/pipeline.sh \
    --app my-app \
    --mode proxy \
    --role-name MyAppRole \
    --deploy
This runs all four phases sequentially: capture → refine → validate → deploy. Omit --deploy for a dry run.
CI/CD Integration
The toolkit includes a GitHub Actions workflow that validates policies on every pull request:
yaml
# .github/workflows/validate-policy.yml
name: Validate IAM Policies
on:
  pull_request:
    paths: ['policies/**', 'terraform/**']

jobs:
  validate:
    runs-on: ubuntu-latest
    steps:
      - uses: actions/checkout@v4
      - name: Install tools
        run: pip install policy_sentry checkov
      - name: Validate policies
        run: ./scripts/validate.sh --input policies/refined/*.json --strict
      - name: Checkov scan
        uses: bridgecrewio/checkov-action@v12
        with:
          directory: terraform/
This means no overprivileged policy ships without someone explicitly approving it. The --strict flag fails the build on any warning, not just errors.
How This Fits Into the Bigger Picture
This toolkit is one piece of a DevSecOps pipeline. Here's how it connects with other tools in the Chaos to Control ecosystem:
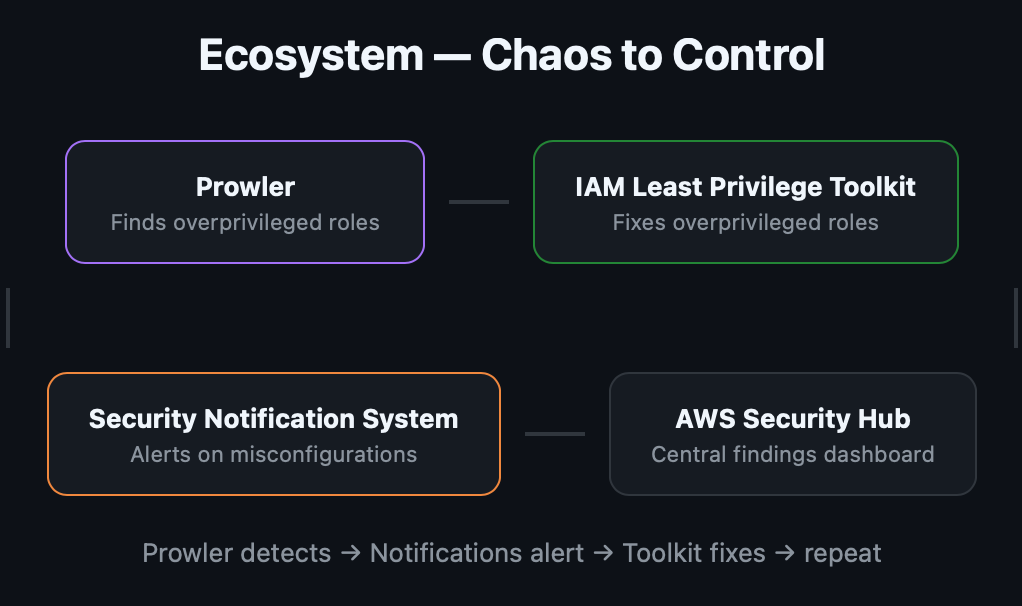
Prowler audits your AWS account and finds roles with overly broad permissions. The AWS Security Notification System alerts your team on Slack when those findings come in. This toolkit fixes the problem by generating and deploying right-sized policies.
Prowler detects → Notifications alert → Toolkit fixes → repeat.
That's the full loop: detect, notify, remediate — all open-source, all automated, all under $10/month.
Real-World Advice
Start with your most critical roles. Don't try to right-size every IAM policy at once. Begin with roles attached to production Lambda functions, ECS tasks, or EC2 instances. These are the roles an attacker would target first.
Run captures for a full business cycle. A five-minute test run won't catch the weekly report generator or the monthly billing job. Run iamlive for at least a full day in a staging environment that mimics production traffic patterns.
Keep the CRUD template in version control. The crud-template.yml file is your documentation of why each permission exists. When someone asks "why does our app have DynamoDB access?", the template has the answer.
Use the AccessDenied alarm as a safety net. Deploy with monitoring enabled and a generous threshold (10-20 denials before alarming). Tighten it over a few weeks as you confirm the policy is complete.
Re-run quarterly. Applications evolve. Dependencies get added. New AWS features get integrated. Schedule a quarterly re-capture to make sure your policies haven't drifted out of sync with reality.
Get Started
The full toolkit is open-source and ready to clone:
bash
git clone https://github.com/Parthasarathi7722/aws-iam-least-privilege.git
cd aws-iam-least-privilege
./scripts/install.sh
Resources:
- IAM Least Privilege Toolkit — The complete toolkit (this post)
- iamlive — Record AWS API calls in real-time
- Policy Sentry — Generate least-privilege IAM policies
- Checkov — IaC security scanning
- AWS Security Notification System — Real-time Slack alerts for AWS security events
- Prowler — AWS security auditing (584 checks)
Originally published on Chaos to Control — DevSecOps blueprints for small teams.