Building a DevSecOps Pipeline with GitHub Actions: Part-2
Your pipeline runs 5 security tools. Great. But are they actually blocking bad code — or just logging findings nobody reads? Here's how to turn your security scans into real enforcement with configurable gates, exception management, and custom rules tailored to your stack.
In Part 1, we built a 7-stage DevSecOps pipeline from scratch — Gitleaks, Semgrep, Trivy, ZAP, and a deploy gate, all wired into GitHub Actions. If you haven't read that yet, start there. It covers the tools, the order, and the reasoning behind the architecture.
This post picks up where that left off. Because having security tools in your pipeline is only half the story. The other half is answering these questions:
- Is a finding actually blocking the PR, or just showing up in a log?
- Who decides whether to override a finding and merge anyway?
- How do you handle false positives without disabling the tool entirely?
- Can you write rules specific to your codebase, not just generic OWASP checks?
If you can't answer all four confidently, your pipeline is a compliance checkbox, not a security control.
Let's fix that.
The Problem: Alert-Only Pipelines
Here's a pattern I see constantly. A team sets up security scanning in CI. The tools run. SARIF reports upload to the GitHub Security tab. Everyone feels good.
Then someone pushes a dependency with a critical CVE. The pipeline runs. Trivy logs the finding. The PR merges anyway because Trivy never actually returned a non-zero exit code. The "security pipeline" was decoration.
This happens because most pipeline tutorials show you how to run the tools, not how to enforce them. Running semgrep scan and uploading results is monitoring. Running semgrep scan --error --severity ERROR and failing the job is enforcement.
The difference is one flag. But that one flag is the difference between a security-aware pipeline and a security-enforced pipeline.
The Report + Enforce Pattern
The updated pipeline uses a deliberate two-step pattern for every security tool:
Step 1: Report — Run the scan, generate a SARIF file, upload to GitHub Security tab. This step always succeeds regardless of findings. It ensures you never lose visibility.
Step 2: Enforce — Run the scan again with strict flags (--error, exit-code: 1). This step only runs when the gate is set to block. It's the step that actually stops the PR.
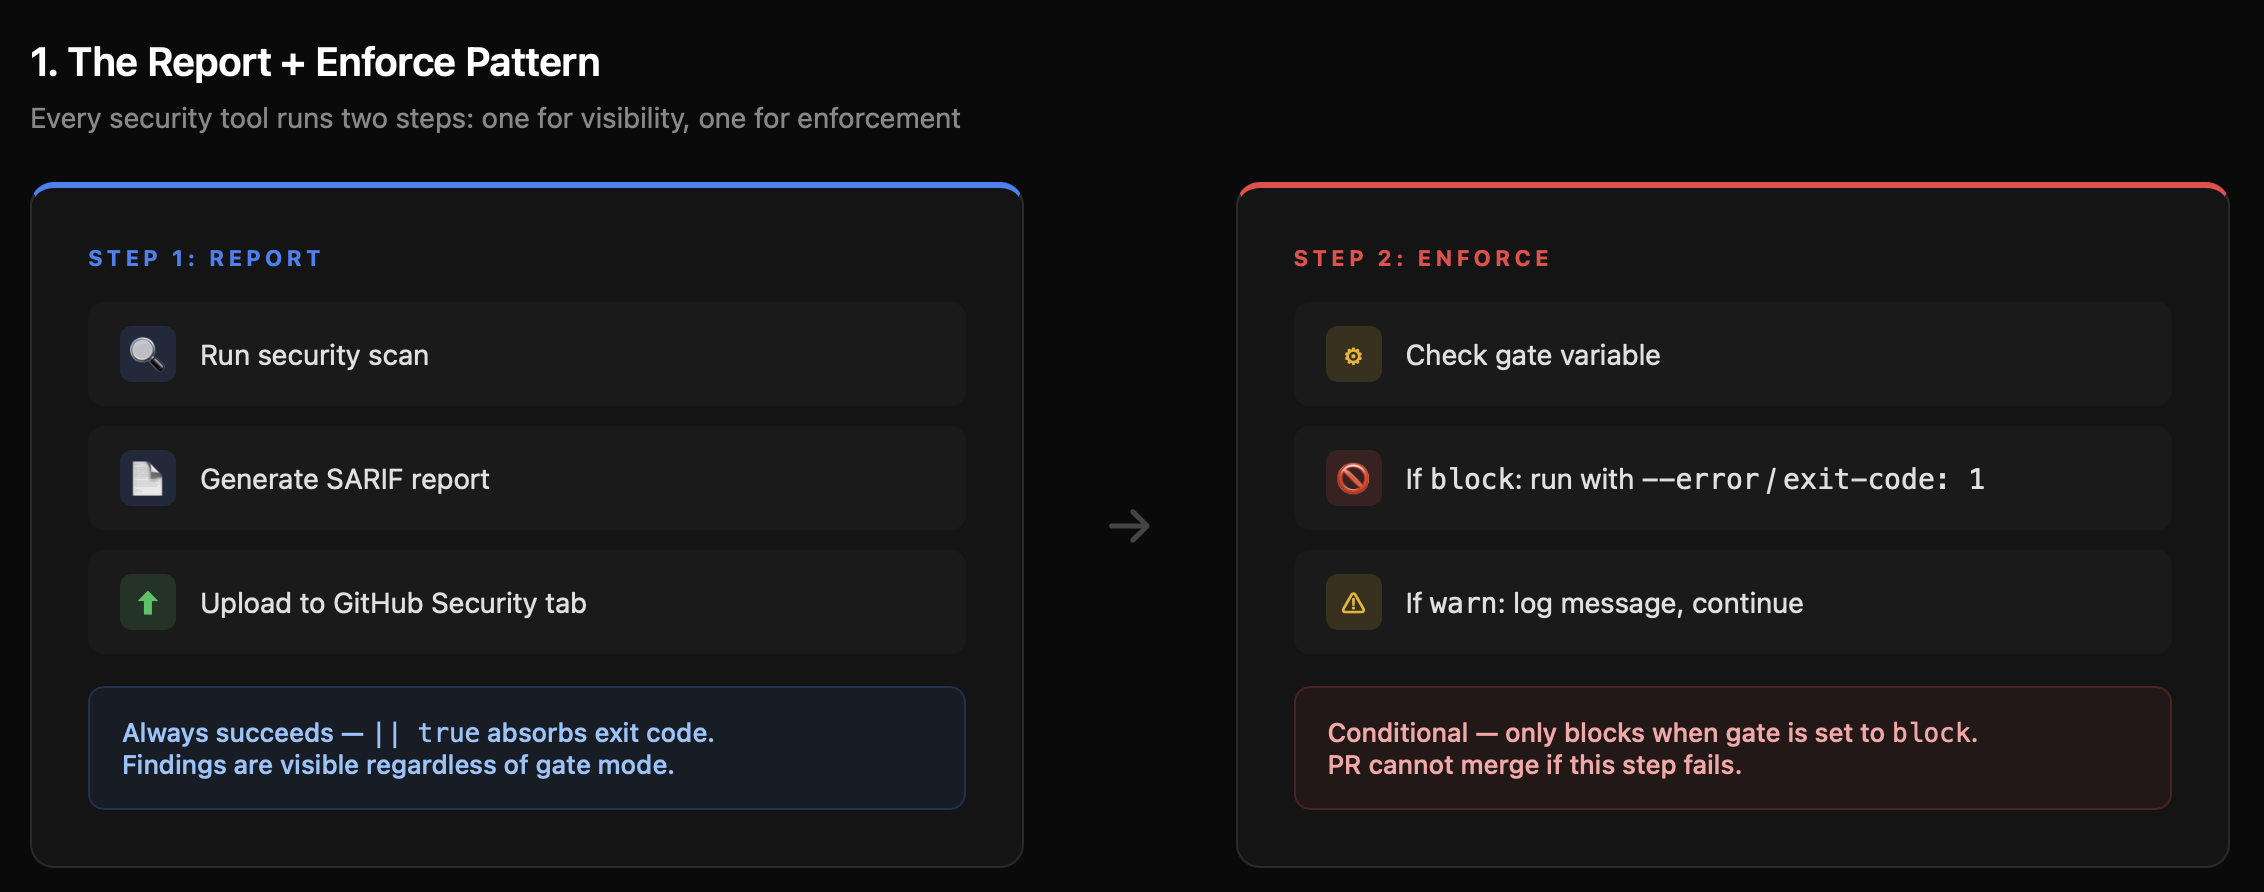
Why two steps? Because you want the report uploaded even when the gate blocks. If the enforce step ran first and failed, the SARIF upload would be skipped (unless you use if: always() carefully). By separating them, the reporting pipeline and the enforcement pipeline are independent.
Here's what this looks like for Semgrep:
yaml
semgrep:
  name: "2: SAST (Semgrep)"
  runs-on: ubuntu-latest
  steps:
    - name: Checkout code
      uses: actions/checkout@v4

    # Step 1: Report (always succeeds — || true absorbs exit code)
    - name: Run Semgrep (report)
      run: |
        docker run --rm \
          -v "${{ github.workspace }}:/src" \
          returntocorp/semgrep:latest \
          semgrep scan \
            --config auto \
            --config .semgrep/custom-rules.yml \
            --sarif \
            --output /src/semgrep.sarif \
            /src || true

    - name: Upload Semgrep SARIF
      uses: github/codeql-action/upload-sarif@v3
      if: always()
      with:
        sarif_file: semgrep.sarif
        category: semgrep

    # Step 2: Enforce (only blocks when gate = 'block')
    - name: Enforce gate
      run: |
        if [ "${{ env.SEMGREP_GATE }}" = "block" ]; then
          echo "GATE MODE: BLOCK — failing on ${{ env.SEMGREP_SEVERITY }} findings."
          docker run --rm \
            -v "${{ github.workspace }}:/src" \
            returntocorp/semgrep:latest \
            semgrep scan \
              --config auto \
              --config .semgrep/custom-rules.yml \
              --severity ${{ env.SEMGREP_SEVERITY }} \
              --error \
              /src
        else
          echo "GATE MODE: WARN — findings reported but pipeline will continue."
        fi
The || true on the report step is the key. It ensures the SARIF file is generated and uploaded regardless of findings. The enforce step then separately decides whether to block based on the gate mode.
Every tool in the pipeline follows this same pattern. Gitleaks uses continue-on-error: true on the action step, then a separate "Enforce gate" step that checks the outcome. Trivy runs twice — once for SARIF output, once with exit-code: '1' when the gate is set to block.
Configurable Gates via GitHub Repository Variables
Hard-coding exit-code: '1' everywhere sounds right until you're rolling out to a team with 200 existing findings. Day one, every PR is blocked. Day two, someone removes the exit code "temporarily." Day ninety, it's still gone.
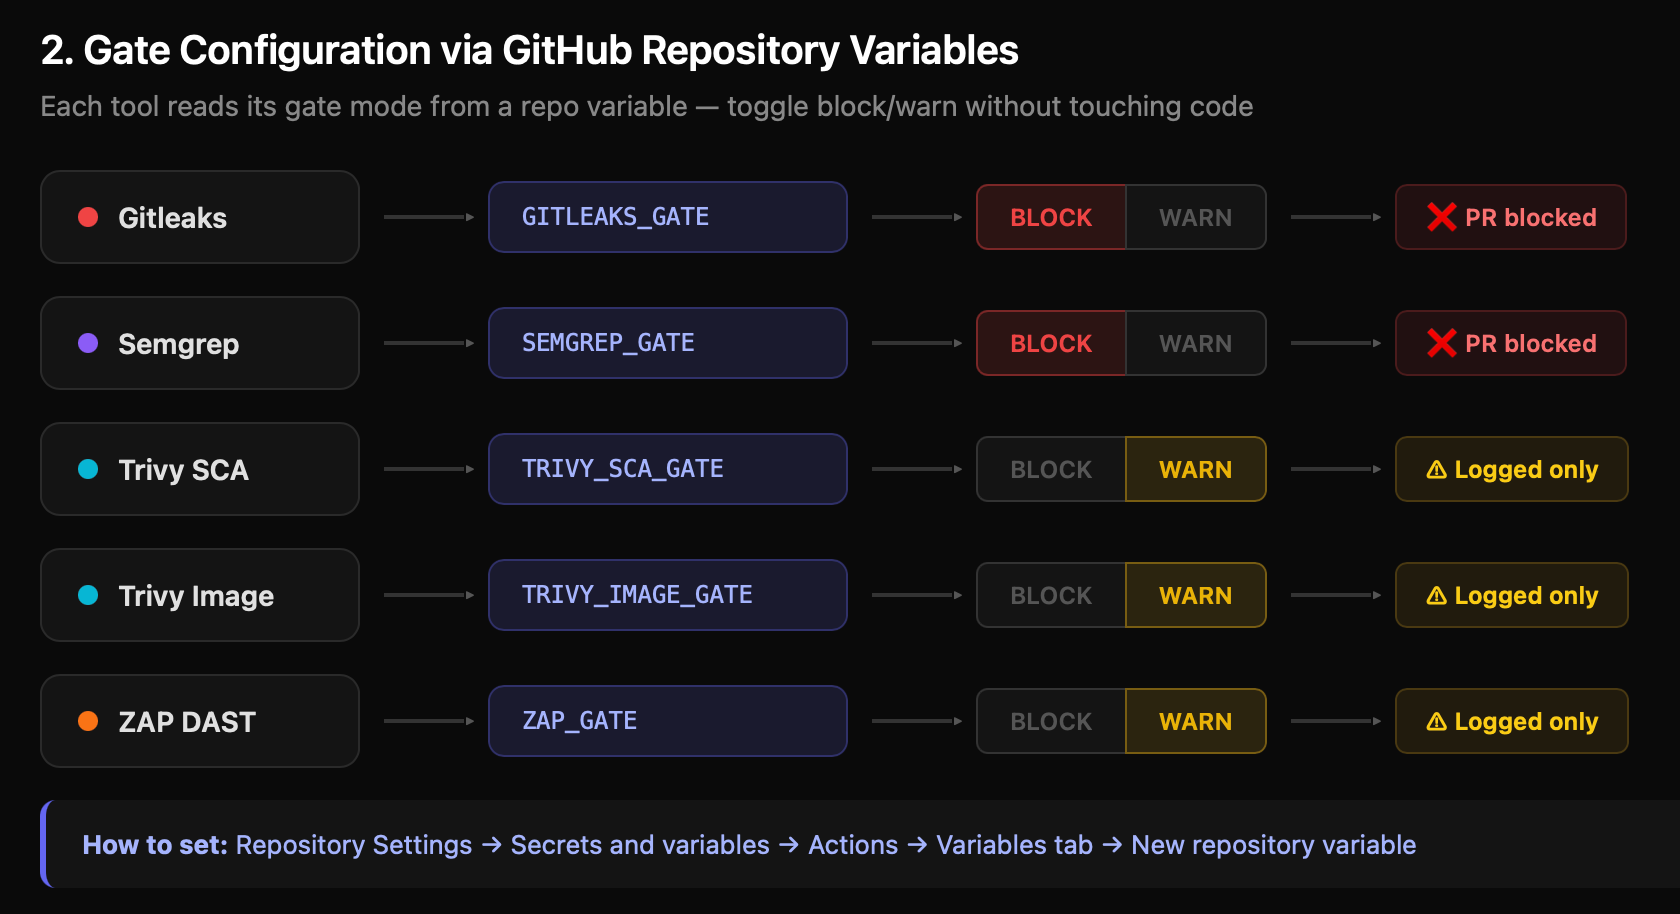
The solution: make every gate configurable. The pipeline reads gate modes from GitHub Repository Variables:
yaml
env:
  # Default: block. Override per-tool via Settings → Variables
  GITLEAKS_GATE:    ${{ vars.GITLEAKS_GATE    || 'block' }}
  SEMGREP_GATE:     ${{ vars.SEMGREP_GATE     || 'block' }}
  TRIVY_SCA_GATE:   ${{ vars.TRIVY_SCA_GATE   || 'block' }}
  TRIVY_IMAGE_GATE: ${{ vars.TRIVY_IMAGE_GATE || 'block' }}
  ZAP_GATE:         ${{ vars.ZAP_GATE         || 'block' }}
  TRIVY_SEVERITY:   ${{ vars.TRIVY_SEVERITY   || 'CRITICAL,HIGH' }}
  SEMGREP_SEVERITY: ${{ vars.SEMGREP_SEVERITY || 'ERROR' }}
To configure these, go to your repo's Settings → Secrets and Variables → Actions → Variables tab and add each variable. Set to block to enforce, warn to report only.
This gives you three things:
1. Gradual rollout. Start every tool in warn mode. Let teams see findings without being blocked. Flip to block tool-by-tool as the backlog clears.
2. Per-tool control. Maybe Gitleaks should always block (leaked secrets are never acceptable) but Trivy should warn during a major framework migration when dependency upgrades are in progress.
3. Audit trail. GitHub tracks variable changes. You can see who switched a gate from block to warn and when.
Recommended Rollout Strategy
| Week | Gitleaks | Semgrep | Trivy SCA | Trivy Image | ZAP |
|---|---|---|---|---|---|
| 1 | block | warn | warn | warn | warn |
| 2 | block | block | warn | warn | warn |
| 3 | block | block | block | warn | warn |
| 4 | block | block | block | block | block |
Secrets always block from day one. There's no gradual approach to leaked credentials — they're immediately exploitable. Everything else can ramp up.
Rulesets (Branch Protection): Making Gates Actually Block Merges
Here's a subtlety that trips people up: even if a GitHub Actions job fails, a PR can still be merged unless you configure branch protection rules.
The pipeline jobs are status checks. Branch protection is what makes those status checks required. Without it, a developer can click "Merge pull request" even when the red X is showing.
Go to Settings → Repository → Rulesets→ Add rule for main:
- Require status checks to pass before merging — Enable this
- Search and add these status checks:
1: Secrets (Gitleaks)2: SAST (Semgrep)3: SCA (Trivy)
- Require branches to be up to date before merging — Enable this
- Require approvals — Set to at least 1 reviewer
- Dismiss stale pull request approvals when new commits are pushed — Enable this (a review before the security fix doesn't count after a force-push)
- Do not allow bypassing the above settings — Enable this, even for admins
That last point matters. If admins can bypass, someone will bypass "just this once" during a production incident, and the habit sticks.
The Deploy Gate: Environment Protection
The final stage — the deploy gate — uses a GitHub Environment called production. This adds a human approval layer that's separate from the automated checks:
yaml
deploy-gate:
  name: "7: Deploy Gate"
  runs-on: ubuntu-latest
  needs: [ gitleaks, semgrep, trivy-sca ]
  if: github.ref == 'refs/heads/main' && github.event_name == 'push'
  environment: production
  steps:
    - name: Security gate summary
      run: |
        echo "╔══════════════════════════════════════════════╗"
        echo "║         SECURITY GATE SUMMARY                ║"
        echo "╠══════════════════════════════════════════════╣"
        echo "║ Gitleaks:    ${{ env.GITLEAKS_GATE }}         ║"
        echo "║ Semgrep:     ${{ env.SEMGREP_GATE }}          ║"
        echo "║ Trivy SCA:   ${{ env.TRIVY_SCA_GATE }}       ║"
        echo "║ Trivy Image: ${{ env.TRIVY_IMAGE_GATE }}     ║"
        echo "║ ZAP DAST:    ${{ env.ZAP_GATE }}             ║"
        echo "╠══════════════════════════════════════════════╣"
        echo "║ All security gates passed.                   ║"
        echo "║ Commit: ${{ github.sha }}                    ║"
        echo "╚══════════════════════════════════════════════╝"
To set this up, go to Settings → Environments → New environment → name it production. Then:
- Required reviewers: Add your security lead or team lead. They must click "Approve" before the deploy job runs.
- Wait timer: Optionally add a delay (e.g., 10 minutes) for a cooling period.
- Deployment branches: Restrict to
mainonly.
The security gate summary printed in the logs gives the approver full context on what modes are active. They can see at a glance whether any gates were in warn mode, which is a signal to check the Security tab more carefully before approving.
Whitelisting: Managing False Positives Without Killing the Tool
Every security tool produces false positives. The wrong response is to disable the tool or set the gate to warn permanently. The right response is surgical whitelisting — suppress the specific finding while keeping everything else enforced.
Each tool has its own mechanism. Here's how to configure all of them.
Gitleaks: .gitleaks.toml
Gitleaks uses a TOML configuration file at the repo root. The [allowlist] section controls what gets skipped:
toml
# .gitleaks.toml
title = "devsecops-pipeline Gitleaks Config"

[extend]
useDefault = true  # Keep all default detection rules

# Allowlist paths (regex patterns)
[allowlist]
description = "Allowlist for test fixtures and sample data"
paths = [
  "(?i).*test.*",
  "(?i).*fixture.*",
  "(?i).*example.*",
  "(?i).*sample.*",
  "(?i)\\.md$",
  "(?i).*README.*"
]
commits = [
  # Specific commits to skip (useful for historical commits)
  # "abc123def456..."
]
Three types of allowlisting:
- Path-based: Skip entire directories (test fixtures, examples, documentation). Use regex patterns.
- Commit-based: Skip specific historical commits where a secret was already rotated. Add the full commit hash.
- Regex-based: Skip specific patterns you know are safe. For example, a placeholder
AKIAIOSFODNN7EXAMPLEin documentation.
Trivy: .trivyignore
Trivy uses a simple text file listing CVEs to ignore. The critical addition: expiry dates.
# .trivyignore

# CVE-2021-41091
# exp: 2026-06-30
# rego: Moby/Docker vulnerability — mitigated by non-root user in our Dockerfile

# CVE-2021-43565
# exp: 2026-06-30
# rego: OpenSSH vulnerability — not exploitable in container context

# CVE-2022-24999
# exp: 2026-09-30
# rego: Express.js DoS — only certain configs affected, reviewed as acceptable
The exp: field is what makes this sustainable. Without expiry dates, ignored CVEs pile up and never get re-evaluated. With a 90-day expiry, each exception forces a periodic review: is the mitigation still valid? Has a fix been released? Should this come off the ignore list?
Rules for managing .trivyignore:
- Never ignore CRITICAL severity without documented approval
- Always set an expiry date (30-90 days)
- Always document the justification in
rego: - Review the file monthly — remove expired entries, re-assess ongoing ones
Semgrep: Inline nosemgrep
Semgrep uses inline comments to suppress specific findings:
python
# Suppress a specific rule on one line
password = os.environ["DB_PASSWORD"]  # nosemgrep: hardcoded-credentials

# Suppress all rules on one line
eval(safe_expression)  # nosemgrep
For broader suppression, exclude paths in the Semgrep command itself:
yaml
semgrep scan --config auto --exclude tests/ --exclude "*.test.js"The inline approach is better because it's visible in code review. A reviewer sees nosemgrep and can ask, "Why was this suppressed?" Path exclusions are invisible unless someone reads the workflow YAML.
ZAP: .zap-rules.tsv
ZAP uses a tab-separated file mapping rule IDs to actions:
tsv
# .zap-rules.tsv
# RuleID    RuleName                        Action
10037       SQL Injection                   FAIL
10034       Cross-Site Scripting (Reflected) FAIL
10052       X-Frame-Options Header Missing  WARN
10067       Missing Encoding                PASS
Three actions:
- FAIL: Blocks the pipeline if ZAP detects this issue.
- WARN: Logs the finding but allows the pipeline to continue.
- PASS: Ignores the finding entirely.
The pipeline ships with 50+ rules pre-configured. Critical injection and authentication issues (SQL injection, XSS, command injection, broken access control) are set to FAIL — 40 rules in total. Header-related issues (X-Frame-Options, HSTS, Referrer-Policy) are set to WARN — 13 rules. Informational items (server header disclosure, content type mismatch) are set to PASS or WARN.
Customize these based on your application. If your app genuinely doesn't use frames, you might move X-Frame-Options to PASS. If your app handles sensitive data, you might promote HSTS from WARN to FAIL.
Custom Rules: Teaching the Tools Your Codebase
Generic rulesets catch generic vulnerabilities. Custom rules catch the patterns you know are dangerous in your specific codebase.
Semgrep Custom Rules
The pipeline includes a .semgrep/custom-rules.yml file with four production rules. Here's one that catches hardcoded credentials — the kind of thing that generic rules sometimes miss because the variable names are non-standard:
yaml
rules:
  - id: hardcoded-credentials
    pattern-either:
      - pattern: password = "..."
      - pattern: api_key = "..."
      - pattern: secret = "..."
    message: Potential hardcoded credentials detected
    languages: [python, javascript, typescript, go, java]
    severity: CRITICAL
    metadata:
      category: security
      references:
        - https://owasp.org/www-community/vulnerabilities/Hardcoded_Passwords
And one that catches SQL injection via dynamic query construction — not just SELECT * WHERE id = $input, but also ORM escape hatches like db.query() and db.raw():
yaml
  - id: sql-injection-dynamic-query
    pattern-either:
      - pattern: query($INPUT)
      - pattern: execute("SELECT * FROM users WHERE id=" + $ID)
      - pattern: db.query("SELECT * FROM " + $TABLE)
    message: Potential SQL injection — use parameterized queries
    languages: [python, javascript, typescript, java, php]
    severity: CRITICAL
    metadata:
      category: security
      references:
        - https://owasp.org/www-community/attacks/SQL_Injection
The pipeline also includes rules for insecure randomness (Math.random() instead of crypto.getRandomValues()) and missing authentication checks on admin endpoints.
Writing your own rules:
- Identify a pattern that has caused issues in your codebase
- Write the Semgrep pattern using their pattern syntax
- Add it to
.semgrep/custom-rules.yml - The workflow automatically includes it via
--config .semgrep/custom-rules.yml
The custom rules run alongside the --config auto default ruleset — you're adding checks on top, not replacing anything.
Gitleaks Custom Rules
The .gitleaks.toml file defines custom secret detection patterns with entropy thresholds:
toml
[[rules]]
id = "aws-access-key"
description = "AWS Access Key"
regex = '''(?i)aws_access_key_id\s*=\s*[A-Za-z0-9/+=]+'''
keywords = ["aws_access_key"]
entropy = 3.0

[[rules]]
id = "database-uri"
description = "Database Connection String"
regex = '''(?i)(postgres|mongodb|mysql)://[^\s]+:[^\s]+@[^\s]+'''
keywords = ["password", "uri", "connection"]

[[rules]]
id = "slack-token"
description = "Slack Token"
regex = '''xox[a-zA-Z]-[a-zA-Z0-9]{10,13}'''
keywords = ["slack"]

[[rules]]
id = "github-token"
description = "GitHub Personal Access Token"
regex = '''ghp_[0-9a-zA-Z]{36}'''
keywords = ["github"]
The entropy field is important — it filters out low-entropy strings that match the pattern but aren't actually secrets. Without it, a test file containing aws_access_key_id = EXAMPLE would trigger the rule. With entropy = 3.0, only strings with sufficient randomness (actual keys) match.
The pipeline ships with rules for AWS keys, database URIs, private keys (RSA, DSA, EC, PGP, OpenSSH), Slack tokens, GitHub tokens, and Docker registry auth. Add rules for any service-specific tokens your team uses.
ZAP Rule Customization
ZAP's rule IDs map to specific vulnerability checks from the OWASP catalog. The .zap-rules.tsv file lets you control which checks fail the pipeline, which warn, and which are ignored.
The default configuration categorizes 50+ rules across three tiers: 40 rules set to FAIL (injection, XSS, authentication, CSRF), 13 rules set to WARN (header misconfigurations, information disclosure), and 1 rule set to PASS (informational items that don't indicate a vulnerability).
To customize, find the ZAP rule ID in the ZAP Alert Reference, then add or modify a line in .zap-rules.tsv.
Pre-Commit Hooks: Shift Left to the Developer's Machine
The CI pipeline catches everything, but it's a feedback loop measured in minutes. Pre-commit hooks catch issues in seconds — before the code even leaves the developer's machine.
The pipeline includes a .pre-commit-config.yaml with 14 hooks:
yaml
repos:
  # Security: Secret scanning
  - repo: https://github.com/gitleaks/gitleaks
    rev: v8.18.2
    hooks:
      - id: gitleaks
        entry: gitleaks detect --verbose --source . --exit-code 1
        stages: [commit]

  # Security: SAST
  - repo: https://github.com/returntocorp/semgrep
    rev: v1.55.0
    hooks:
      - id: semgrep
        entry: semgrep --error --config p/security-audit --config p/owasp-top-ten --config .semgrep/custom-rules.yml
        types: [python, javascript, typescript, go, java]

  # Code quality
  - repo: https://github.com/pre-commit/pre-commit-hooks
    rev: v4.5.0
    hooks:
      - id: trailing-whitespace
      - id: end-of-file-fixer
      - id: check-yaml
      - id: check-json
      - id: check-merge-conflict
      - id: detect-private-key
      - id: debug-statements
      - id: check-case-conflict

  # Linting
  - repo: https://github.com/adrienverge/yamllint
    rev: v1.32.0
    hooks:
      - id: yamllint

  - repo: https://github.com/hadolint/hadolint
    rev: v2.12.1
    hooks:
      - id: hadolint-docker

  - repo: https://github.com/shellcheck-py/shellcheck-py
    rev: v0.9.0.5
    hooks:
      - id: shellcheck

  - repo: https://github.com/igorshubovych/markdownlint-cli
    rev: v0.37.0
    hooks:
      - id: markdownlint
To install:
bash
pip install pre-commit
pre-commit install
Now every git commit runs Gitleaks and Semgrep locally first. A leaked secret is caught before it ever enters git history — which matters because once a secret hits a remote branch, it's in the reflog even after the commit is amended.
The pre-commit config mirrors the CI pipeline's custom rules. Semgrep runs p/security-audit, p/owasp-top-ten, and your custom .semgrep/custom-rules.yml — the same configuration as the CI job. This means a developer who passes pre-commit will also pass the CI gate, reducing wasted CI minutes.
The Hardened Dockerfile
The pipeline includes an example Dockerfile in examples/Dockerfile that demonstrates every container hardening practice you should follow:
dockerfile
# Stage 1: Builder
FROM node:20-alpine AS builder
WORKDIR /app
COPY package*.json ./
RUN npm ci --only=production && npm cache clean --force
COPY . .
RUN npm run build --if-present

# Stage 2: Runtime
FROM node:20-alpine
WORKDIR /app
RUN addgroup -g 1001 -S nodejs && \
    adduser -S nodejs -u 1001
COPY --from=builder --chown=nodejs:nodejs /app/node_modules ./node_modules
COPY --from=builder --chown=nodejs:nodejs /app/package*.json ./
COPY --from=builder --chown=nodejs:nodejs /app/dist ./dist
COPY --from=builder --chown=nodejs:nodejs /app/src ./src
USER nodejs
EXPOSE 8080
HEALTHCHECK --interval=30s --timeout=10s --start-period=5s --retries=3 \
    CMD node -e "require('http').get('http://localhost:8080/health', (r) => {if (r.statusCode !== 200) throw new Error(r.statusCode)})"
CMD ["node", "dist/index.js"]
What this does right:
- Alpine base image: Minimal attack surface — 5 MB vs 300 MB for full Debian images
- Multi-stage build: Build tools and dev dependencies stay in the builder stage, never reach the final image
- Non-root user: The
nodejsuser (UID 1001) runs the process, not root. If the container is compromised, the attacker doesn't get root access - Specific COPY: Only
node_modules,package*.json,dist/, andsrc/— notCOPY .which would include.env,.git, and other sensitive files - npm ci: Reproducible installs from
package-lock.json, notnpm installwhich can resolve to newer versions. Cache cleaned after install to reduce image size - Health check: Uses a Node.js HTTP request to
/healthwith a 10-second timeout. Enables orchestrators (ECS, Kubernetes) to detect unhealthy containers and replace them
When Trivy scans this image, it starts with a much smaller surface area — fewer packages to scan, fewer potential vulnerabilities.
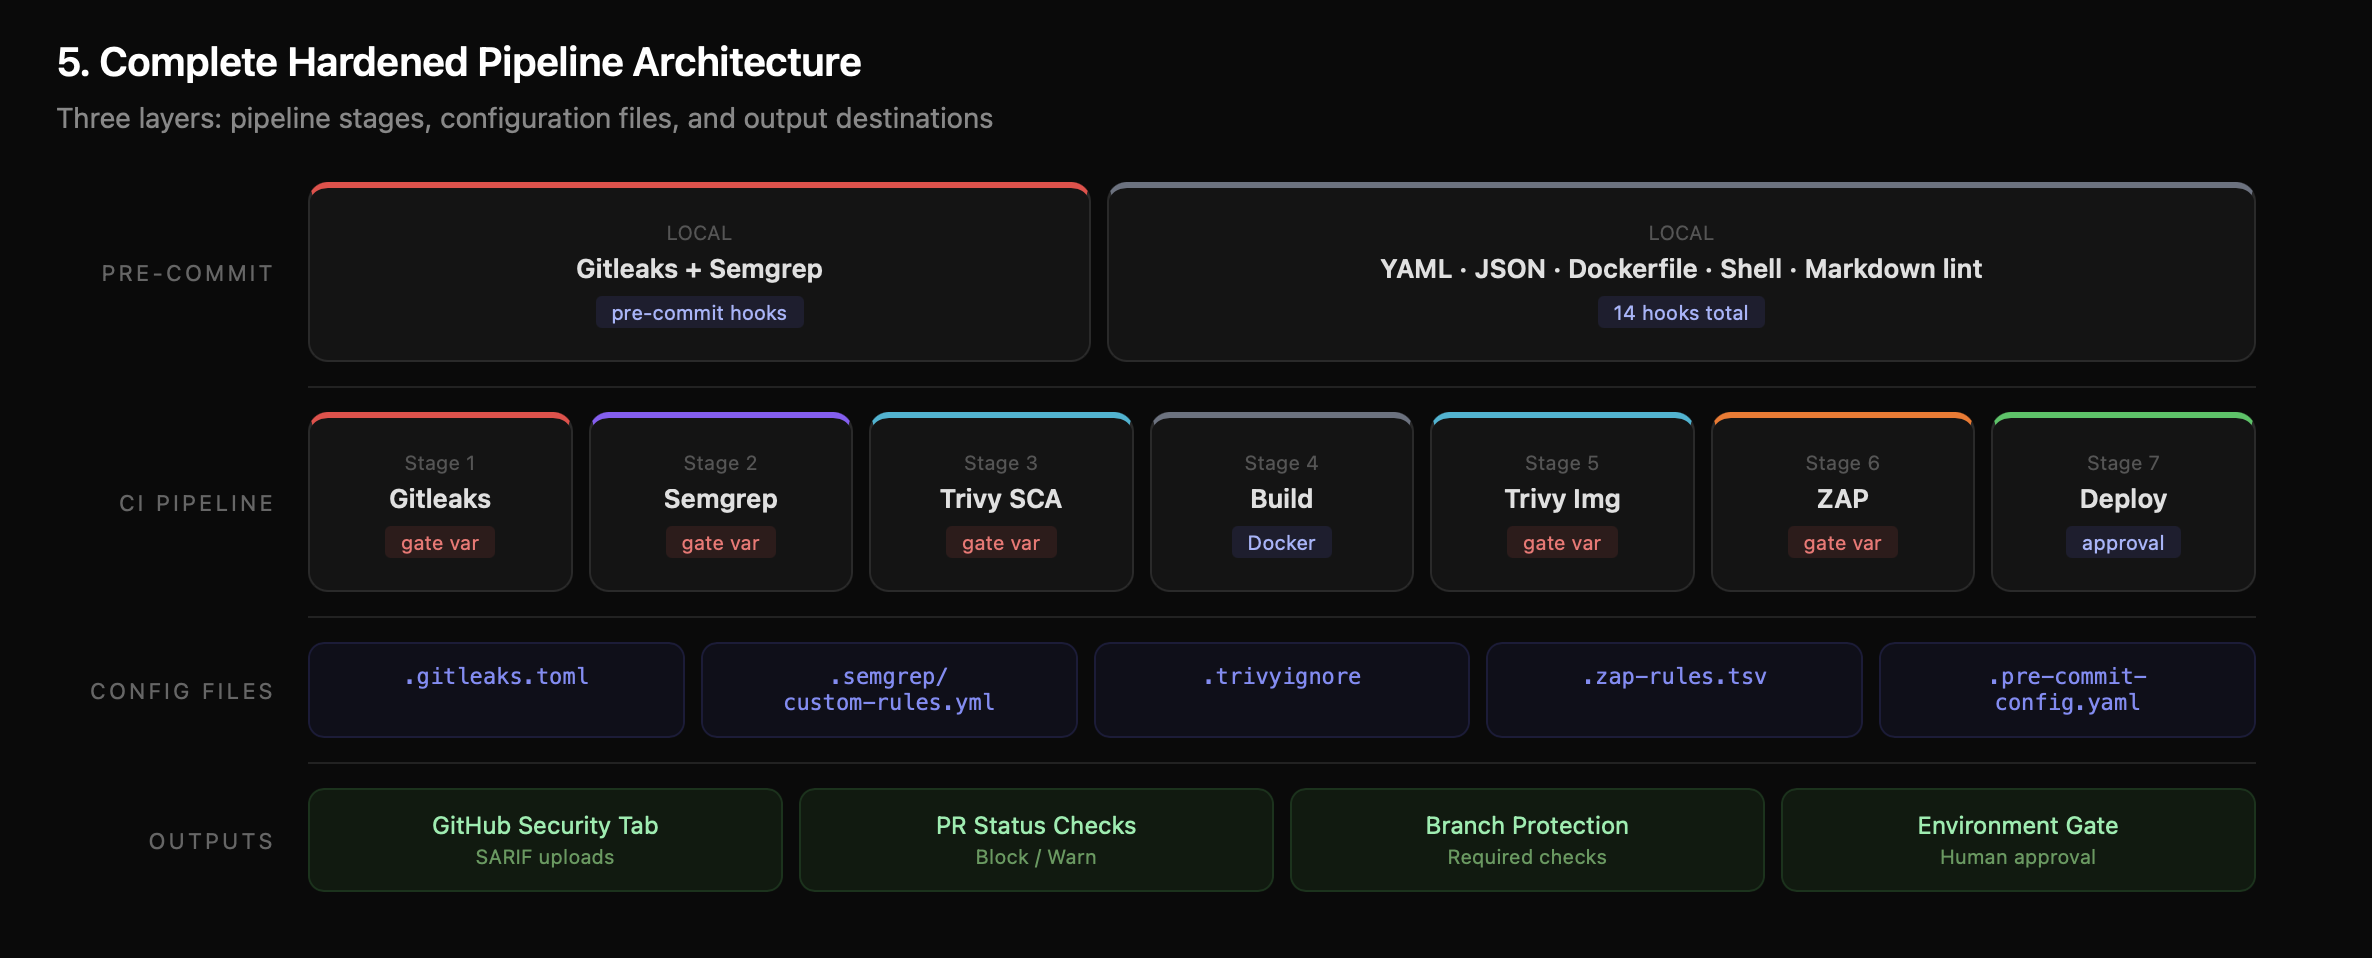
Putting It All Together
Here's the complete architecture of the hardened pipeline:
The key evolution from Part 1 to Part 2:
| Feature | Part 1 | Part 2 |
|---|---|---|
| Tool execution | Fixed (always runs) | Configurable (block/warn per tool) |
| Gating | Hard-coded or missing | Report + Enforce pattern, GitHub Variables |
| False positives | Manual disable | Surgical whitelisting per tool |
| Rules | Default rulesets only | Custom rules for Semgrep, Gitleaks, ZAP |
| Developer feedback | CI only (minutes) | Pre-commit hooks (seconds) |
| Merge blocking | Pipeline fails (optional) | Branch protection (required) |
| Deploy approval | Automated | Environment protection (human approval) |
| Dockerfile | Basic example | Hardened multi-stage with non-root user |
The pipeline is your foundation. Gating makes it enforceable. Whitelisting makes it sustainable. Custom rules make it yours.
Resources:
- DevSecOps Pipeline — Complete Project — Fork and deploy
- Part 1: Building a DevSecOps Pipeline from Scratch — The foundational post
- Semgrep Rule Syntax — Write your own SAST rules
- Gitleaks Configuration — Custom secret detection
- ZAP Alert Reference — Full list of ZAP rule IDs
- GitHub Branch Protection — Required status checks
- AWS Security Notification System — Real-time Slack alerts
- IAM Least Privilege Toolkit — Right-size IAM permissions
Originally published on Chaos to Control — DevSecOps blueprints for small teams that can't afford to get security wrong.