Building a DevSecOps Pipeline with GitHub Actions: Part-1
7 stages. 5 open-source tools. Every commit scanned for secrets, vulnerabilities, and misconfigurations before it touches production. Here's the complete blueprint — fork the workflow and deploy it today.
Most teams bolt security on at the end. The code ships, the pen test happens three months later, and the report sits in a shared drive until someone asks about it during an audit.
That's not DevSecOps. That's dev-ops-and-then-security-complains.
Real DevSecOps bakes security checks into every commit, every pull request, every build. The developer gets feedback in minutes, not months. And with the right tools, the entire thing costs $0 in licensing.
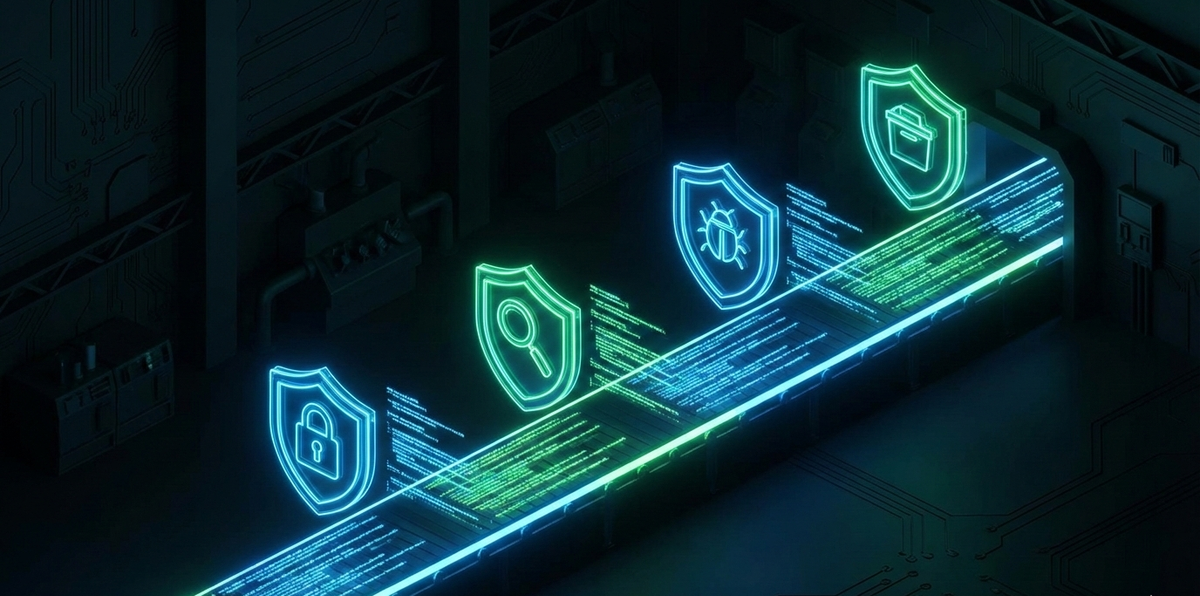
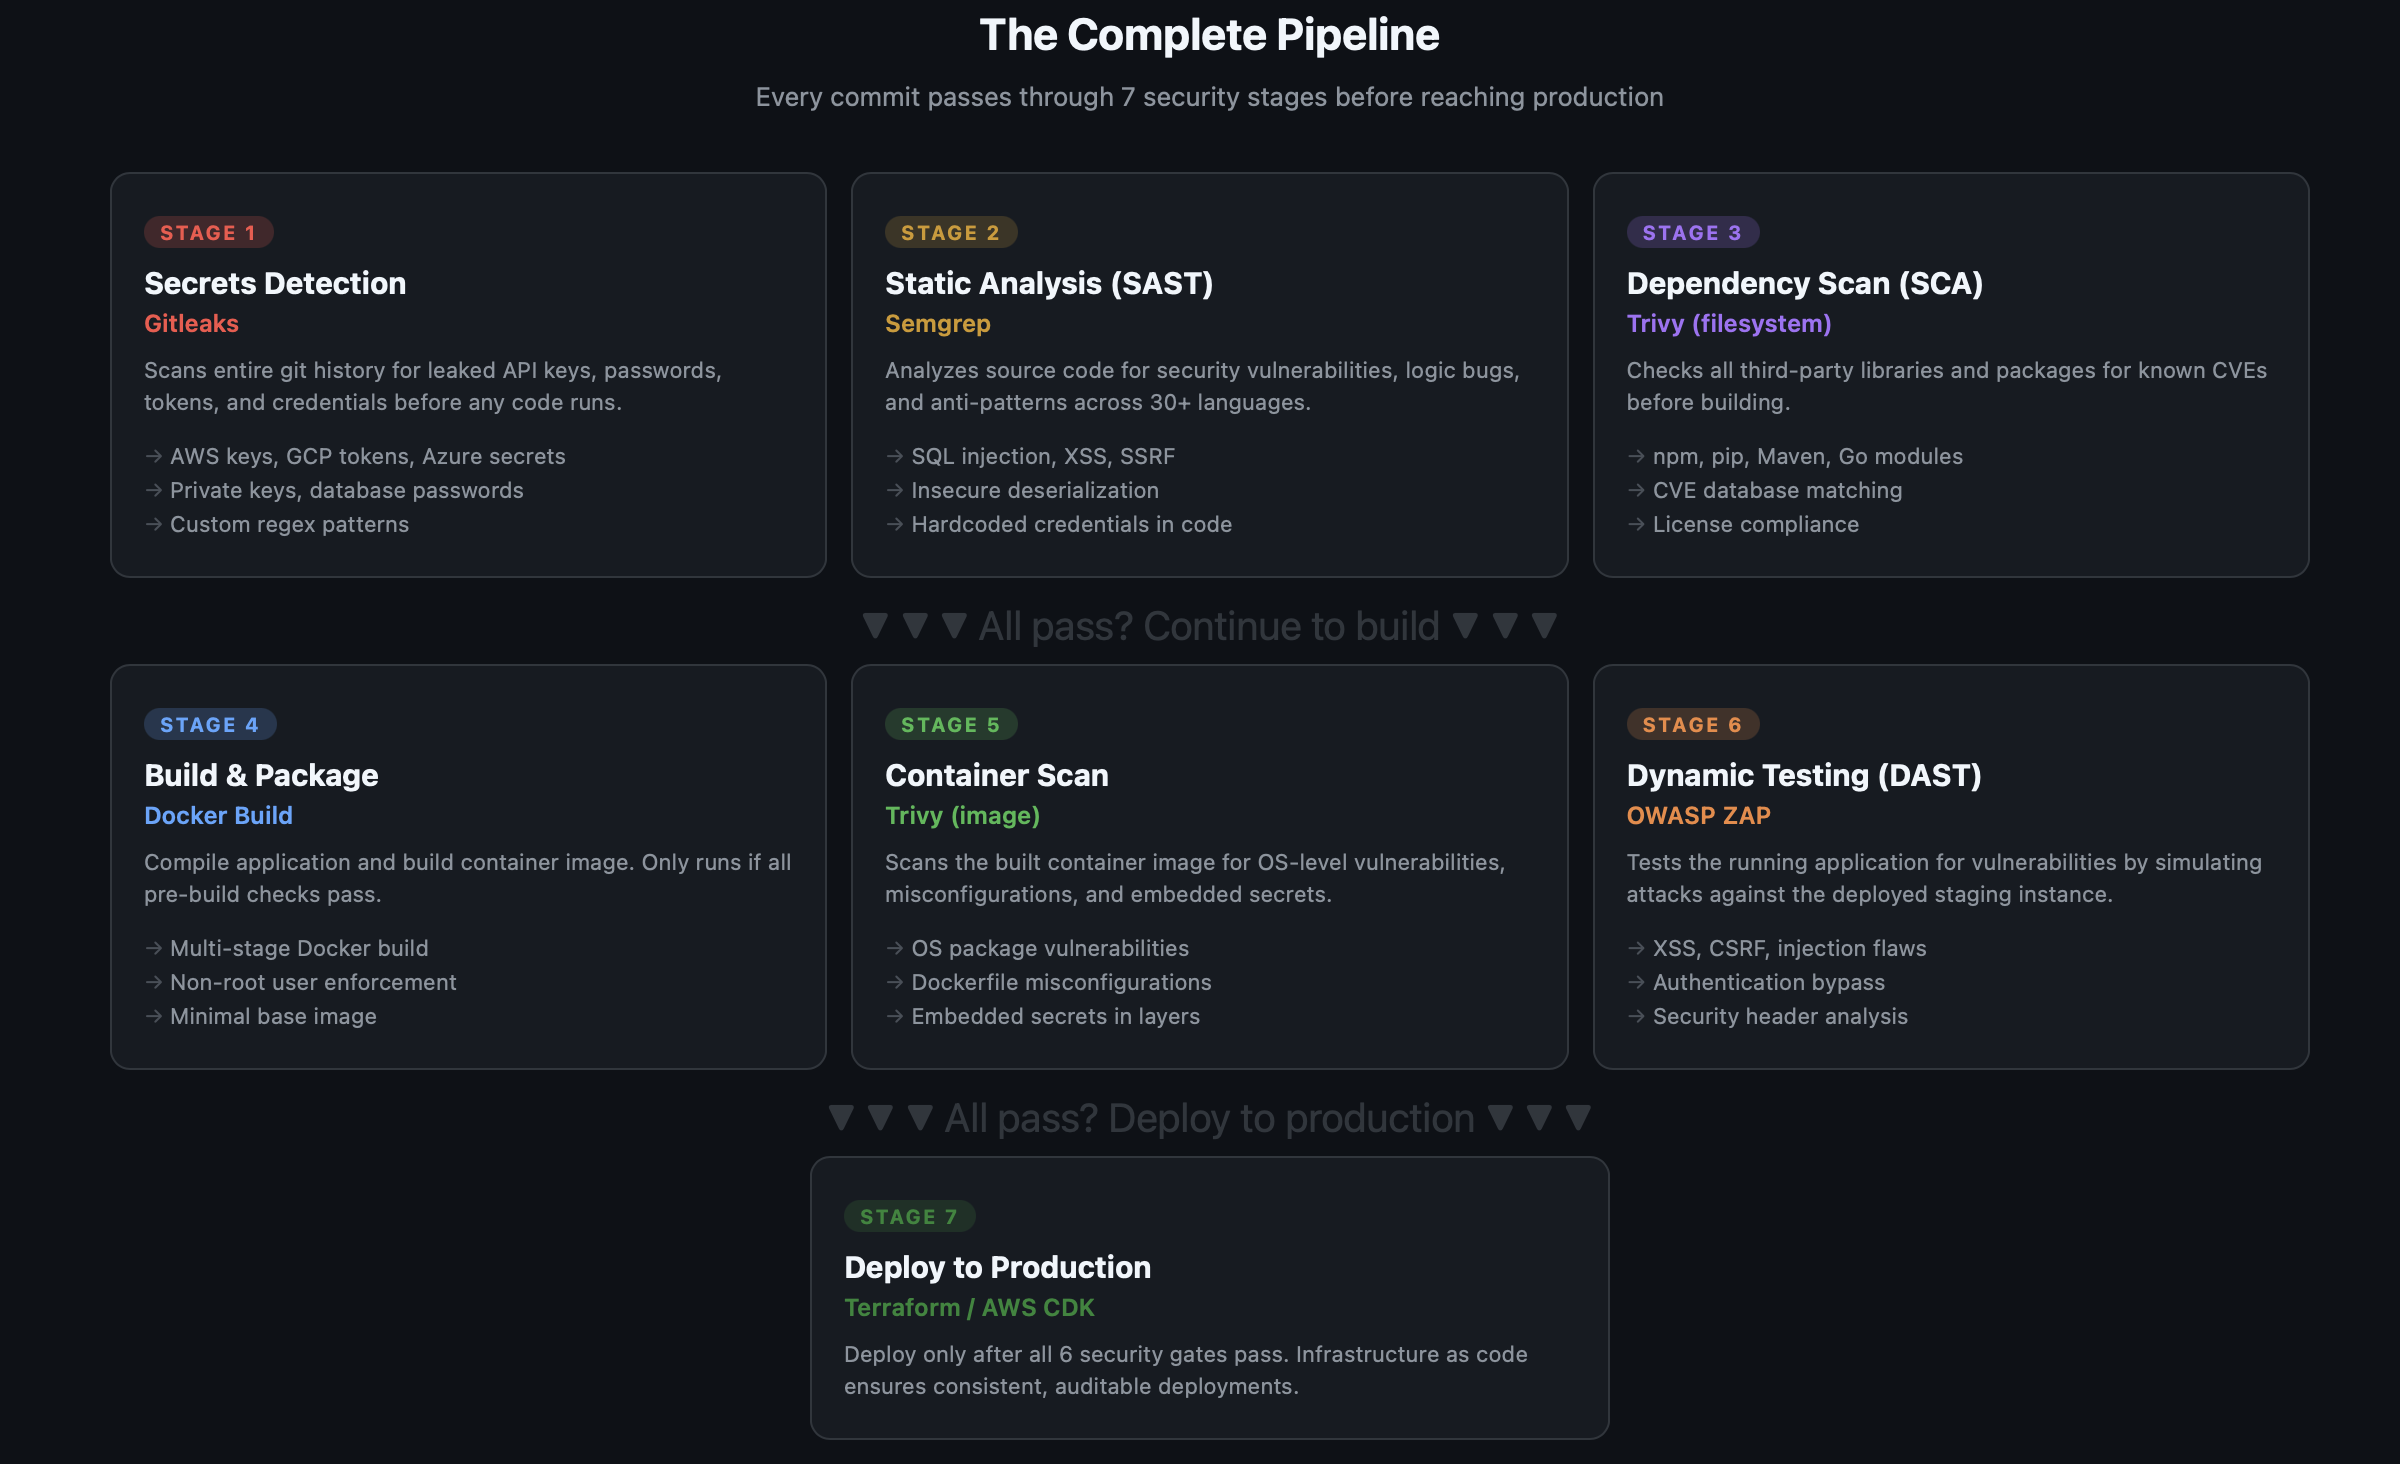
This post walks through building a complete DevSecOps pipeline using GitHub Actions — from secrets detection to dynamic application testing — step by step. Every tool is open-source. Every workflow file is ready to fork. By the end, your pipeline will look like this:
Why This Order Matters: Shift Left
The order of these stages isn't arbitrary. It follows the shift-left principle — catch bugs as early as possible, where they're cheapest to fix.
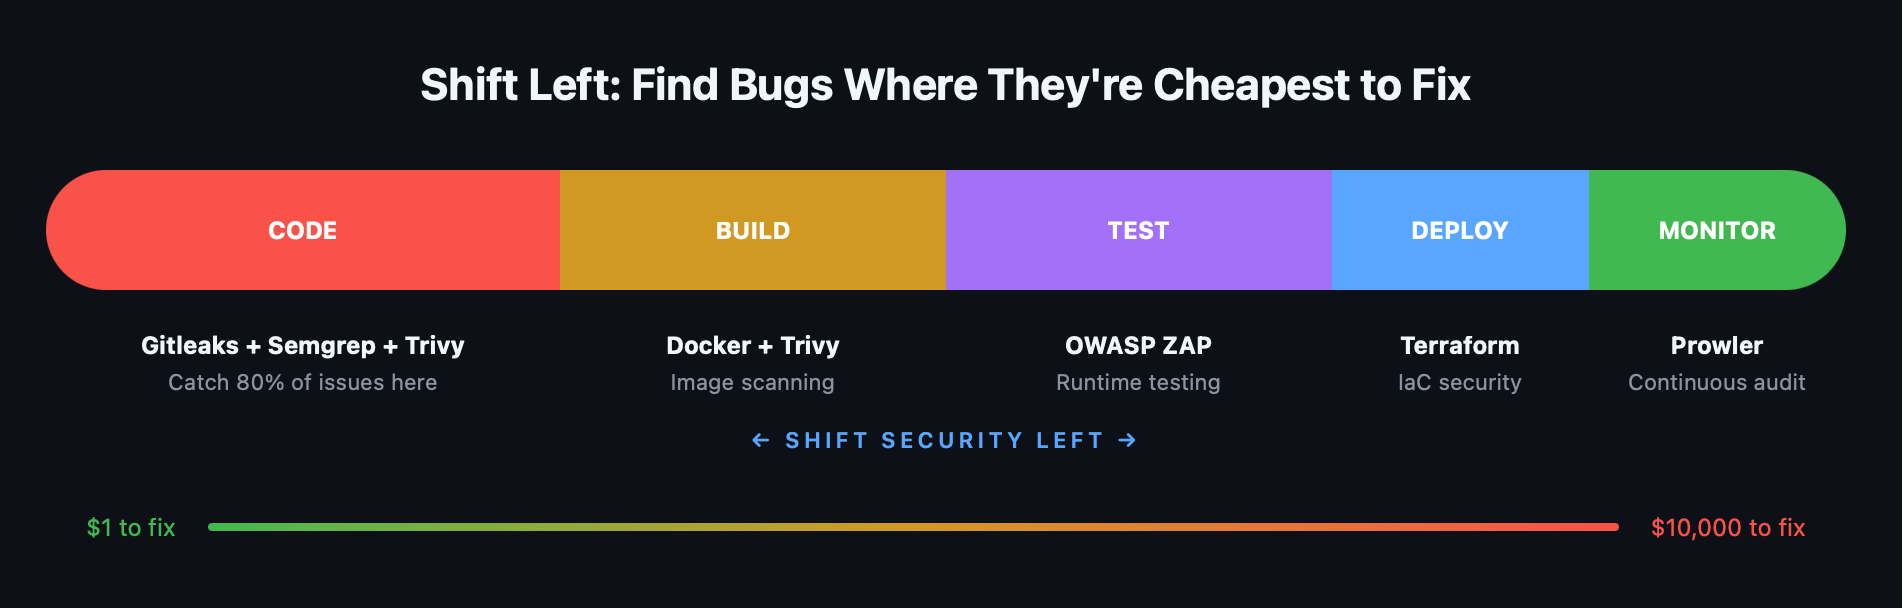
A leaked API key caught in a pre-commit scan costs five minutes to rotate. That same key discovered in production after a breach costs incident response, customer notifications, regulatory fines, and your weekend.
The pipeline is ordered by two rules:
- Fast checks run first. Secrets scanning takes seconds. SAST takes a minute. SCA takes a minute. If any of these fail, we don't waste time building a container image.
- Static before dynamic. Analyze the code before running it. The more you catch statically, the less noise your DAST produces.
The Tools
Here's what we're using and why:
| Stage | Tool | What It Does | Why This One |
|---|---|---|---|
| Secrets | Gitleaks | Scans git history for leaked credentials | Fast, low false-positive rate, PR commenting built-in |
| SAST | Semgrep | Static code analysis for security bugs | 30+ languages, semantic analysis (not just regex), 2,500+ rules |
| SCA | Trivy (filesystem) | Checks dependencies for known CVEs | Single binary, covers npm/pip/Maven/Go, fast |
| Build | Docker | Container image packaging | Standard tooling |
| Container | Trivy (image) | Scans container for OS-level vulns | Same tool as SCA, consistent UX, scans all layers |
| DAST | OWASP ZAP | Tests running app for vulnerabilities | Industry standard, active community, free |
| Deploy | Terraform | Infrastructure as code | Auditable, repeatable, version-controlled |
All open-source. All free. All with GitHub Actions integrations.
Prerequisites
Before we start, you need:
- A GitHub repository with your application code
- A Dockerfile for your application (if you're containerizing)
- A staging environment URL (for DAST scanning)
- GitHub Actions enabled on your repository
Stage 1: Secrets Detection — Gitleaks
Why it's first: A leaked AWS key in your git history is an immediate, exploitable vulnerability. Nothing else matters until this is clean.
Gitleaks scans your entire git history — not just the latest commit — for patterns matching API keys, passwords, tokens, private keys, and database connection strings.
The Workflow
yaml
# .github/workflows/1-secrets-scan.yml
name: "Stage 1: Secrets Detection"

on:
  push:
    branches: [main, develop]
  pull_request:

jobs:
  gitleaks:
    name: Gitleaks Scan
    runs-on: ubuntu-latest
    steps:
      - name: Checkout code
        uses: actions/checkout@v4
        with:
          fetch-depth: 0  # Full history — critical for scanning all commits

      - name: Run Gitleaks
        uses: gitleaks/gitleaks-action@v2
        env:
          GITHUB_TOKEN: ${{ secrets.GITHUB_TOKEN }}
That's it. Seven lines of configuration and every push and PR gets scanned.
What It Catches
Gitleaks ships with 150+ detection rules covering:
- AWS access keys and secret keys
- GCP service account keys
- Azure storage account keys
- GitHub, GitLab, and Bitbucket tokens
- Stripe, Twilio, and Slack API keys
- Private keys (RSA, DSA, ECDSA)
- Database connection strings
- Generic passwords and secrets
Custom Rules
Create a .gitleaks.toml in your repo root to add custom rules or allowlist known false positives:
toml
# .gitleaks.toml

# Allow test fixtures with fake keys
[allowlist]
  paths = [
    '''test/fixtures/.*''',
    '''examples/.*\.example'''
  ]

# Custom rule for internal API tokens
[[rules]]
  id = "internal-api-token"
  description = "Internal API Token"
  regex = '''INTERNAL_TOKEN_[A-Za-z0-9]{32}'''
  tags = ["internal", "api"]
When It Fails
Gitleaks exits with code 1 when it finds secrets, blocking the PR. The developer sees exactly which file and line contains the leak, along with the rule that triggered it.
Pro tip: Add Gitleaks as a pre-commit hook too, so developers catch leaks before they push. In your .pre-commit-config.yaml:
yaml
repos:
  - repo: https://github.com/gitleaks/gitleaks
    rev: v8.21.2
    hooks:
      - id: gitleaks
Stage 2: Static Analysis (SAST) — Semgrep
Why it's second: After confirming no secrets are leaked, analyze the code itself for vulnerabilities.
Semgrep does semantic code analysis — it understands code structure, not just text patterns. It finds SQL injection, XSS, SSRF, insecure deserialization, and hundreds of other vulnerability classes across 30+ languages.
The Workflow
yaml
# .github/workflows/2-sast-scan.yml
name: "Stage 2: SAST — Semgrep"

on:
  push:
    branches: [main, develop]
  pull_request:

jobs:
  semgrep:
    name: Semgrep Scan
    runs-on: ubuntu-latest
    permissions:
      contents: read
      security-events: write  # Required for SARIF upload

    steps:
      - name: Checkout code
        uses: actions/checkout@v4

      - name: Run Semgrep
        run: |
          docker run --rm \
            -v "${{ github.workspace }}:/src" \
            returntocorp/semgrep:latest \
            semgrep scan \
              --config auto \
              --sarif \
              --output /src/semgrep-results.sarif \
              /src

      - name: Upload SARIF to GitHub Security
        uses: github/codeql-action/upload-sarif@v3
        if: always()
        with:
          sarif_file: semgrep-results.sarif
          category: semgrep

      - name: Fail on high-severity findings
        run: |
          docker run --rm \
            -v "${{ github.workspace }}:/src" \
            returntocorp/semgrep:latest \
            semgrep scan \
              --config auto \
              --severity ERROR \
              --error \
              /src
Understanding --config auto
The auto configuration pulls Semgrep's recommended ruleset for the languages detected in your repo. For a typical Node.js + Python project, this includes:
- OWASP Top 10 checks (injection, XSS, SSRF, etc.)
- Language-specific anti-patterns (eval usage, unsafe deserialization)
- Framework-specific rules (Express.js, Django, Flask, React)
- Security best practices (TLS configuration, crypto misuse)
Custom Rules
Semgrep's power is custom rules written in YAML. Add a .semgrep/ directory to your repo:
yaml
# .semgrep/custom-rules.yml
rules:
  - id: no-hardcoded-database-host
    patterns:
      - pattern: |
          $DB_HOST = "..."
    message: "Hardcoded database host detected. Use environment variables."
    languages: [python, javascript, typescript]
    severity: WARNING

  - id: no-eval-user-input
    patterns:
      - pattern: eval($USER_INPUT)
      - pattern-where: $USER_INPUT originates from request
    message: "User input passed to eval() — code injection risk"
    languages: [python, javascript]
    severity: ERROR
Run your custom rules alongside the default set:
bash
semgrep scan --config auto --config .semgrep/ --sarifSARIF Upload
Uploading results in SARIF format to GitHub surfaces findings directly in the Security tab of your repository and as inline annotations on pull requests. Developers see the vulnerability right where they introduced it.
Stage 3: Dependency Scanning (SCA) — Trivy
Why it's third: Your code might be secure, but your dependencies might not be. The average application has hundreds of transitive dependencies — any one of them could have a known CVE.
Trivy scans your project's dependency manifests (package-lock.json, requirements.txt, go.sum, pom.xml, etc.) against vulnerability databases.
The Workflow
yaml
# .github/workflows/3-sca-scan.yml
name: "Stage 3: SCA — Trivy Dependency Scan"

on:
  push:
    branches: [main, develop]
  pull_request:
  schedule:
    - cron: '0 6 * * 1'  # Weekly Monday scan for new CVEs

jobs:
  trivy-sca:
    name: Trivy Filesystem Scan
    runs-on: ubuntu-latest
    permissions:
      contents: read
      security-events: write

    steps:
      - name: Checkout code
        uses: actions/checkout@v4

      - name: Run Trivy SCA
        uses: aquasecurity/trivy-action@v0.33.1
        with:
          scan-type: 'fs'
          scan-ref: '.'
          format: 'sarif'
          output: 'trivy-sca.sarif'
          severity: 'CRITICAL,HIGH'
          ignore-unfixed: true

      - name: Upload SARIF
        uses: github/codeql-action/upload-sarif@v3
        if: always()
        with:
          sarif_file: trivy-sca.sarif
          category: trivy-sca

      - name: Fail on critical vulnerabilities
        uses: aquasecurity/trivy-action@v0.33.1
        with:
          scan-type: 'fs'
          scan-ref: '.'
          severity: 'CRITICAL'
          exit-code: '1'
          ignore-unfixed: true
Why the Scheduled Scan?
New CVEs are published daily. A dependency that was clean last week might have a critical vulnerability today. The weekly cron job catches these even when no code changes are happening.
Ignoring Unfixed Vulnerabilities
The ignore-unfixed: true flag is important. Some CVEs have no fix available yet — flagging them on every PR creates noise and alert fatigue. The pipeline fails only on vulnerabilities that have a patch available, so the developer has a clear action: upgrade the dependency.
Trivy's .trivyignore
For accepted risks, create a .trivyignore file:
# .trivyignore
# CVE-2024-XXXX: Accepted risk — not exploitable in our usage
CVE-2024-XXXX

# Low-priority finding in dev dependency
CVE-2024-YYYY
Stage 4: Build — Docker
Why it's here: The three pre-build stages have passed. The code is clean, dependencies are patched, and no secrets are leaking. Now we build.
yaml
# .github/workflows/4-build.yml
name: "Stage 4: Build"

on:
  push:
    branches: [main, develop]

jobs:
  build:
    name: Build Container Image
    runs-on: ubuntu-latest

    steps:
      - name: Checkout code
        uses: actions/checkout@v4

      - name: Set up Docker Buildx
        uses: docker/setup-buildx-action@v3

      - name: Build image
        uses: docker/build-push-action@v5
        with:
          context: .
          push: false
          load: true
          tags: app:${{ github.sha }}
          cache-from: type=gha
          cache-to: type=gha,mode=max

      - name: Save image for scanning
        run: docker save app:${{ github.sha }} -o /tmp/app-image.tar

      - name: Upload image artifact
        uses: actions/upload-artifact@v4
        with:
          name: app-image
          path: /tmp/app-image.tar
          retention-days: 1
Dockerfile Best Practices
Since the Dockerfile is part of your security surface, follow these hardening rules:
dockerfile
# Use specific, minimal base images
FROM node:20-alpine AS builder
# Never use :latest in production

# Run as non-root
RUN addgroup -g 1001 app && adduser -u 1001 -G app -s /bin/sh -D app
USER app

# Don't copy secrets or unnecessary files
COPY --chown=app:app package*.json ./
RUN npm ci --only=production

# Multi-stage build — final image has no build tools
FROM node:20-alpine
COPY --from=builder /app/node_modules ./node_modules
COPY --chown=app:app . .
USER app
EXPOSE 3000
CMD ["node", "server.js"]
Stage 5: Container Scanning — Trivy (Image)
Why it's fifth: The image is built. Now scan it for OS-level vulnerabilities that don't appear in your application dependencies — things like outdated OpenSSL in the base image or vulnerable system libraries.
yaml
# .github/workflows/5-container-scan.yml
name: "Stage 5: Container Scan"

on:
  push:
    branches: [main, develop]

jobs:
  trivy-image:
    name: Trivy Image Scan
    runs-on: ubuntu-latest
    needs: build
    permissions:
      contents: read
      security-events: write

    steps:
      - name: Download image artifact
        uses: actions/download-artifact@v4
        with:
          name: app-image
          path: /tmp

      - name: Load image
        run: docker load -i /tmp/app-image.tar

      - name: Trivy Image Scan
        uses: aquasecurity/trivy-action@v0.33.1
        with:
          image-ref: 'app:${{ github.sha }}'
          format: 'sarif'
          output: 'trivy-image.sarif'
          severity: 'CRITICAL,HIGH'
          ignore-unfixed: true

      - name: Upload SARIF
        uses: github/codeql-action/upload-sarif@v3
        if: always()
        with:
          sarif_file: trivy-image.sarif
          category: trivy-image

      - name: Fail on critical image vulnerabilities
        uses: aquasecurity/trivy-action@v0.33.1
        with:
          image-ref: 'app:${{ github.sha }}'
          severity: 'CRITICAL'
          exit-code: '1'
          ignore-unfixed: true
What Container Scanning Catches That SCA Doesn't
| Source | SCA (Stage 3) | Container Scan (Stage 5) |
|---|---|---|
| npm/pip/Maven packages | ✔ | ✔ |
| OS packages (apk, apt) | — | ✔ |
| System libraries (OpenSSL, glibc) | — | ✔ |
| Base image vulnerabilities | — | ✔ |
| Dockerfile misconfigurations | — | ✔ |
| Embedded secrets in layers | — | ✔ |
This is why we run Trivy twice — once on your code, once on the full image. Different attack surfaces.
Stage 6: Dynamic Application Testing (DAST) — OWASP ZAP
Why it's sixth: Everything so far has been static — analyzing code, dependencies, and images without running the application. DAST tests the running application by sending actual HTTP requests and analyzing responses.
This catches vulnerabilities that only manifest at runtime: authentication bypasses, session management issues, missing security headers, CSRF tokens that aren't validated.
The Workflow
yaml
# .github/workflows/6-dast-scan.yml
name: "Stage 6: DAST — OWASP ZAP"

on:
  push:
    branches: [main]  # Only on main — requires a running target

jobs:
  deploy-staging:
    name: Deploy to Staging
    runs-on: ubuntu-latest
    outputs:
      staging_url: ${{ steps.deploy.outputs.url }}
    steps:
      - name: Checkout code
        uses: actions/checkout@v4
      - name: Deploy to staging
        id: deploy
        run: |
          # Your staging deployment logic here
          echo "url=https://staging.your-app.com" >> $GITHUB_OUTPUT

  zap-baseline:
    name: ZAP Baseline Scan
    runs-on: ubuntu-latest
    needs: deploy-staging
    steps:
      - name: ZAP Baseline Scan
        uses: zaproxy/action-baseline@v0.15.0
        with:
          target: ${{ needs.deploy-staging.outputs.staging_url }}
          rules_file_name: '.zap-rules.tsv'
          cmd_options: '-a'
          issue_title: 'ZAP Baseline Security Scan'
          fail_action: true

  zap-full:
    name: ZAP Full Scan (Weekly)
    runs-on: ubuntu-latest
    needs: deploy-staging
    if: github.event.schedule == '0 2 * * 0'
    steps:
      - name: ZAP Full Scan
        uses: zaproxy/action-full-scan@v0.13.0
        with:
          target: ${{ needs.deploy-staging.outputs.staging_url }}
          rules_file_name: '.zap-rules.tsv'
          cmd_options: '-a'
          issue_title: 'ZAP Full Security Scan'
Baseline vs Full Scan
Baseline scan — passive only. It spiders the application and analyzes responses without sending any attack payloads. Safe to run on every push. Takes 2-5 minutes.
Full scan — active scanning. It sends attack payloads (SQL injection strings, XSS vectors, etc.) to test for vulnerabilities. Run weekly against staging, not on every push. Takes 15-60 minutes depending on application size.
ZAP Rules File
Control which alerts fail the build with a rules file:
tsv
# .zap-rules.tsv
# ID	Action	(IGNORE, WARN, or FAIL)
10010	WARN	# Cookie Without Secure Flag
10011	FAIL	# Cookie Without HttpOnly Flag
10015	FAIL	# Incomplete or No Cache-control Header
10021	FAIL	# X-Content-Type-Options Header Missing
10038	FAIL	# Content Security Policy Header Not Set
40012	FAIL	# Cross Site Scripting (Reflected)
40014	FAIL	# Cross Site Scripting (Persistent)
40018	FAIL	# SQL Injection
90033	FAIL	# Loosely Scoped Cookie
Stage 7: Deploy
If all six security stages pass, deploy with confidence:
yaml
# .github/workflows/7-deploy.yml
name: "Stage 7: Deploy to Production"

on:
  push:
    branches: [main]

jobs:
  deploy:
    name: Deploy to Production
    runs-on: ubuntu-latest
    needs: [gitleaks, semgrep, trivy-sca, build, trivy-image, zap-baseline]
    if: success()
    environment: production

    steps:
      - name: Checkout code
        uses: actions/checkout@v4

      - name: Configure AWS credentials
        uses: aws-actions/configure-aws-credentials@v4
        with:
          role-to-assume: ${{ secrets.AWS_DEPLOY_ROLE_ARN }}
          aws-region: us-east-1

      - name: Deploy via Terraform
        run: |
          cd terraform/
          terraform init
          terraform apply -auto-approve
The needs array is the key — it creates a dependency chain ensuring no deployment happens unless every security gate passes.
The Combined Workflow
In practice, you'll want a single workflow file that runs all stages. The project repo ships with a consolidated workflow that's ready to fork. Here's how it's structured:
Stages 1-3 (Secrets, SAST, SCA) are active out of the box. These don't require application code — they scan your repo for leaked credentials, code vulnerabilities, and dependency CVEs immediately.
Stages 4-6 (Build, Container Scan, DAST) are disabled by default because they require a real application with a Dockerfile and a health endpoint. The workflow includes commented-out blocks with clear instructions for enabling each one when your app is ready.
Stage 7 (Deploy Gate) uses GitHub Environment protection to require manual approval before production deployment.
Each tool follows a report + enforce pattern — the scan always runs and uploads results to the GitHub Security tab, then a separate step decides whether to block based on a configurable gate variable. This means you get visibility into every finding regardless of whether the gate is set to block or warn.
yaml
# .github/workflows/devsecops-pipeline.yml
name: DevSecOps Pipeline

on:
  push:
    branches: [ main, develop ]
  pull_request:
    branches: [ main, develop ]
  schedule:
    - cron: '0 6 * * 1'  # Weekly scan for new CVEs

env:
  # Gate modes: 'block' (default) or 'warn'. Set via repo Settings → Variables.
  GITLEAKS_GATE:    ${{ vars.GITLEAKS_GATE    || 'block' }}
  SEMGREP_GATE:     ${{ vars.SEMGREP_GATE     || 'block' }}
  TRIVY_SCA_GATE:   ${{ vars.TRIVY_SCA_GATE   || 'block' }}
  TRIVY_SEVERITY:   ${{ vars.TRIVY_SEVERITY   || 'CRITICAL,HIGH' }}
  SEMGREP_SEVERITY: ${{ vars.SEMGREP_SEVERITY || 'ERROR' }}

permissions:
  contents: read
  security-events: write
  issues: write

jobs:
  # ─── Stage 1: Secrets ─────────────────────────
  gitleaks:
    name: "1: Secrets (Gitleaks)"
    runs-on: ubuntu-latest
    steps:
      - uses: actions/checkout@v4
        with:
          fetch-depth: 0
      - name: Run Gitleaks
        id: gitleaks
        uses: gitleaks/gitleaks-action@v2
        continue-on-error: true
        env:
          GITHUB_TOKEN: ${{ secrets.GITHUB_TOKEN }}
          GITLEAKS_CONFIG: .gitleaks.toml
      - name: Enforce gate
        if: steps.gitleaks.outcome == 'failure'
        run: |
          if [ "${{ env.GITLEAKS_GATE }}" = "block" ]; then
            echo "::error::Secrets detected. Fix before merging."
            exit 1
          else
            echo "::warning::Secrets detected but gate is set to warn."
          fi

  # ─── Stage 2: SAST ────────────────────────────
  semgrep:
    name: "2: SAST (Semgrep)"
    runs-on: ubuntu-latest
    steps:
      - uses: actions/checkout@v4
      - name: Semgrep (report)
        run: |
          docker run --rm -v "${{ github.workspace }}:/src" \
            returntocorp/semgrep:latest \
            semgrep scan --config auto --config .semgrep/custom-rules.yml \
              --sarif --output /src/semgrep.sarif /src || true
      - uses: github/codeql-action/upload-sarif@v3
        if: always()
        with:
          sarif_file: semgrep.sarif
          category: semgrep
      - name: Enforce gate
        run: |
          if [ "${{ env.SEMGREP_GATE }}" = "block" ]; then
            docker run --rm -v "${{ github.workspace }}:/src" \
              returntocorp/semgrep:latest \
              semgrep scan --config auto --config .semgrep/custom-rules.yml \
                --severity ${{ env.SEMGREP_SEVERITY }} --error /src
          fi

  # ─── Stage 3: SCA ─────────────────────────────
  trivy-sca:
    name: "3: SCA (Trivy)"
    runs-on: ubuntu-latest
    steps:
      - uses: actions/checkout@v4
      - name: Trivy SCA (report)
        uses: aquasecurity/trivy-action@v0.33.1
        with:
          scan-type: fs
          scan-ref: '.'
          format: sarif
          output: trivy-sca.sarif
          severity: ${{ env.TRIVY_SEVERITY }}
          ignore-unfixed: true
      - uses: github/codeql-action/upload-sarif@v3
        if: always()
        with:
          sarif_file: trivy-sca.sarif
          category: trivy-sca
      - name: Enforce gate
        if: env.TRIVY_SCA_GATE == 'block'
        uses: aquasecurity/trivy-action@v0.33.1
        with:
          scan-type: fs
          scan-ref: '.'
          severity: ${{ env.TRIVY_SEVERITY }}
          exit-code: '1'
          ignore-unfixed: true

  # ─── Stages 4-6: Disabled by default ──────────
  # Build, Container Scan, and DAST require a real application.
  # See the project README for instructions on enabling these stages.

  # ─── Stage 7: Deploy Gate ──────────────────────
  deploy-gate:
    name: "7: Deploy Gate"
    runs-on: ubuntu-latest
    needs: [ gitleaks, semgrep, trivy-sca ]
    if: github.ref == 'refs/heads/main' && github.event_name == 'push'
    environment: production  # Requires approval in GitHub Environment settings
    steps:
      - name: Security gate summary
        run: |
          echo "All security gates passed. Deployment approved."
          echo "Commit: ${{ github.sha }}"
Note: The full workflow in the repo includes commented-out blocks for Stages 4-6 with step-by-step instructions for enabling them. Fork the repo and uncomment when your app is ready.
What the Pipeline Looks Like in GitHub Actions
With the default configuration (Stages 1-3 active), the Actions tab shows:
✅ 1: Secrets (Gitleaks)    (12s)
✅ 2: SAST (Semgrep)        (48s)
✅ 3: SCA (Trivy)           (35s)
   ↓ all pass
⏳ 7: Deploy Gate           (awaiting approval)
Once you enable Stages 4-6, the full pipeline runs in about 8 minutes — a security-hardened deployment in less time than a coffee break:
✅ 1: Secrets         (12s)
✅ 2: SAST            (48s)
✅ 3: SCA             (35s)
   ↓ all pass
✅ 4: Build           (2m 14s)
   ↓ image ready
✅ 5: Container Scan  (1m 02s)
✅ 6: DAST            (3m 45s)
   ↓ all pass
⏳ 7: Deploy Gate     (awaiting approval)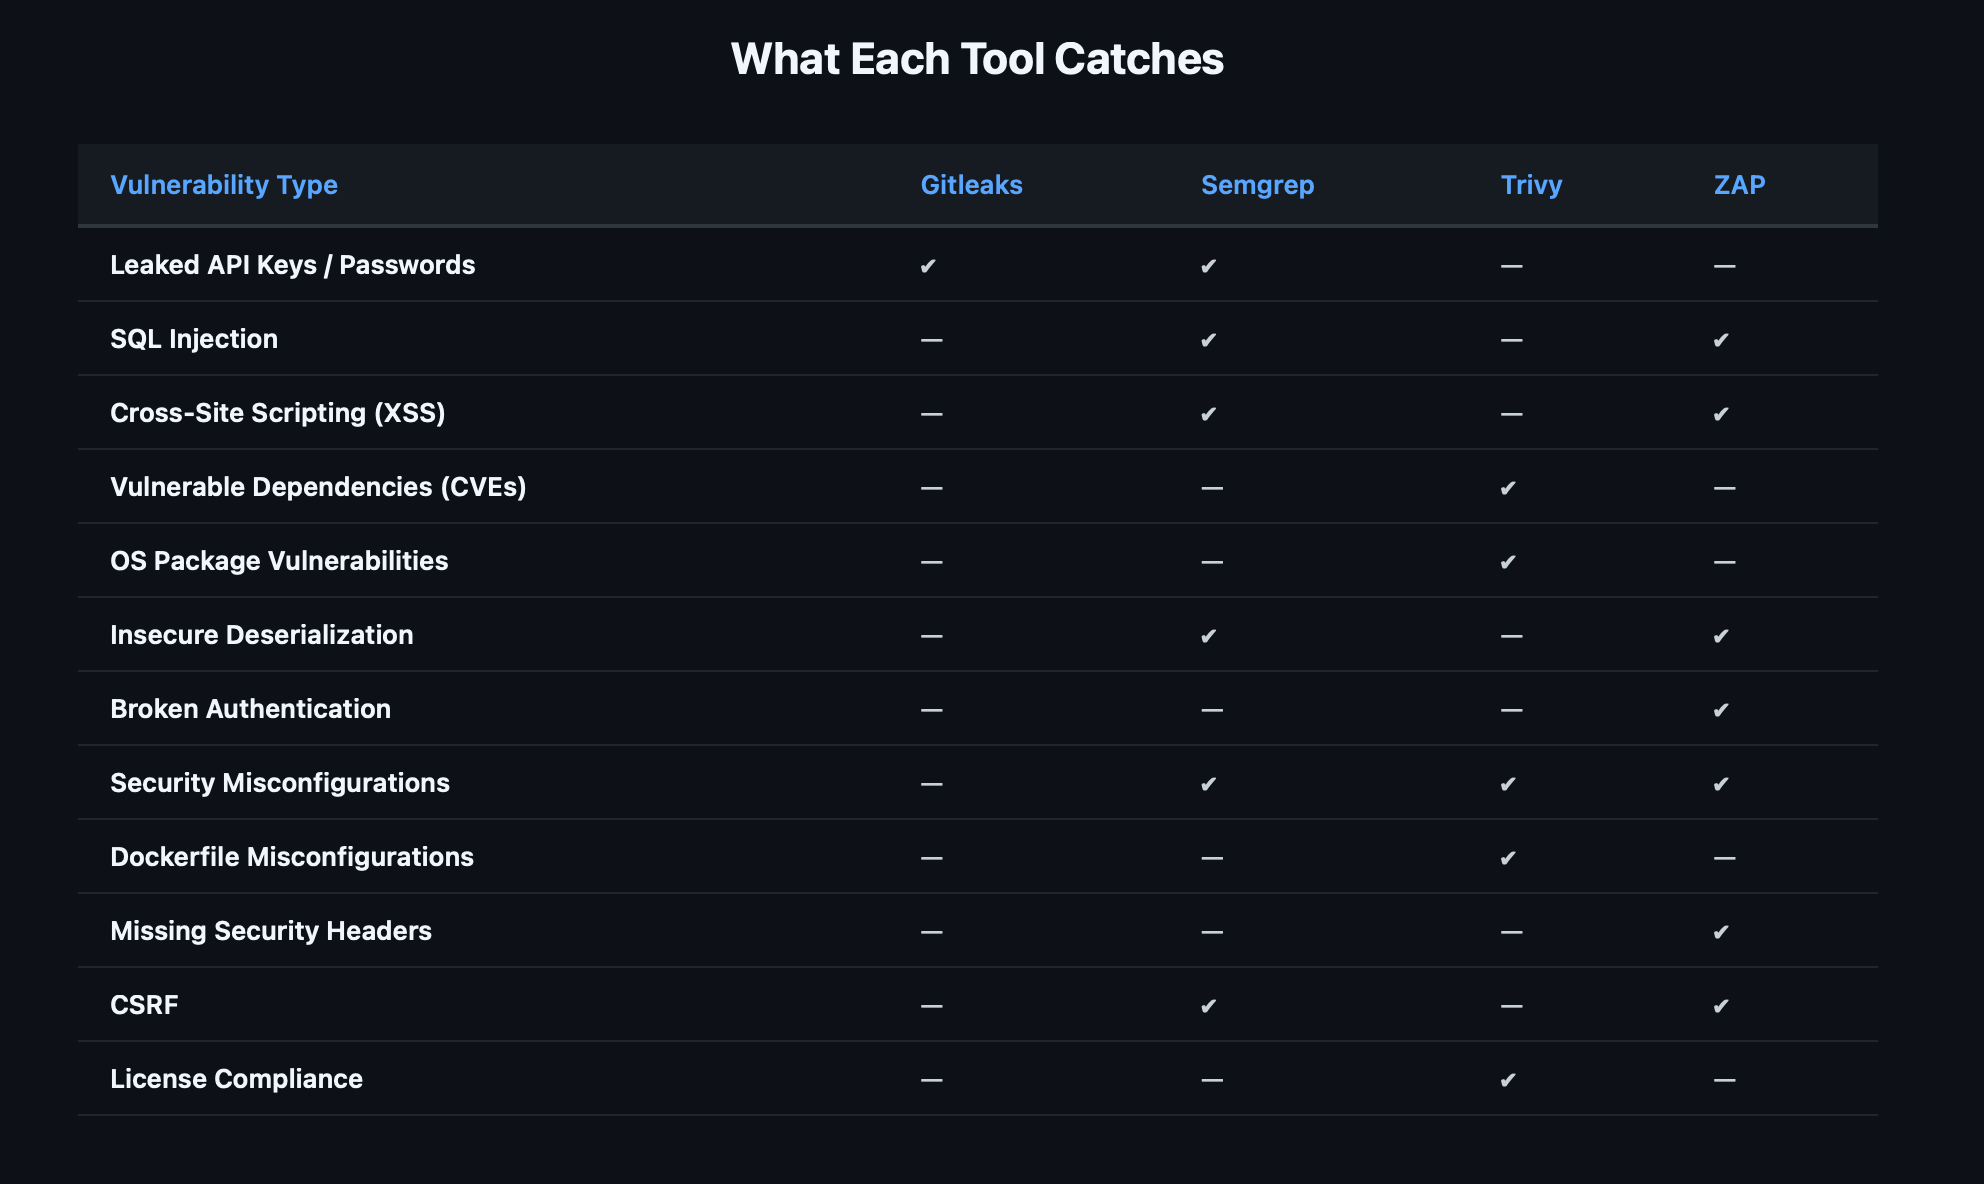
Semgrep and ZAP have the most overlap (both catch injection flaws), but they find them differently — Semgrep through code patterns, ZAP through runtime behavior. A finding caught by both is almost certainly real.
Setting Failure Thresholds
Not every finding should block deployment. Here's a pragmatic approach:
| Tool | Block PR | Block Deploy | Weekly Report |
|---|---|---|---|
| Gitleaks (any secret) | ✔ | ✔ | — |
| Semgrep CRITICAL | ✔ | ✔ | — |
| Semgrep HIGH | ✔ | — | ✔ |
| Semgrep MEDIUM | — | — | ✔ |
| Trivy CRITICAL (fixable) | ✔ | ✔ | — |
| Trivy HIGH (fixable) | — | — | ✔ |
| ZAP HIGH | ✔ | ✔ | — |
| ZAP MEDIUM | — | — | ✔ |
Secrets always block everything. There's no "acceptable risk" for a leaked credential.
Critical vulnerabilities block if fixable. If there's a patch available, the developer should apply it before merging. Unfixed CVEs go into the weekly report.
Medium findings are informational. They show up in the GitHub Security tab and weekly reports but don't break the build. This prevents alert fatigue while keeping visibility.
Rolling This Out to Your Team
The pipeline supports configurable gate modes — each tool can be set to block (fail the PR) or warn (log findings, don't block) via GitHub Repository Variables. This lets you roll out gradually. Add custom Semgrep rules for patterns specific to your codebase. See Part 2 for whitelisting, custom rules, and pre-commit hooks.
What's Next
This post built the pipeline. The next one hardens it.
Part 2: Hardening Your DevSecOps Pipeline — Configurable Gates, Whitelisting, and Custom Rules covers how to turn these scans into real enforcement: configurable block/warn modes per tool, managing false positives with surgical whitelisting, writing custom Semgrep and Gitleaks rules for your stack, pre-commit hooks that catch issues before they leave the developer's machine, and branch protection that makes the gates actually block merges.
The pipeline is your foundation. Everything else builds on top of it.
Resources:
- DevSecOps Pipeline — GitHub Actions Workflows — Fork and deploy
- Gitleaks — Secrets detection
- Semgrep — Static analysis (SAST)
- Trivy — Dependency and container scanning
- OWASP ZAP — Dynamic testing (DAST)
- AWS Security Notification System — Real-time Slack alerts
- IAM Least Privilege Toolkit — Right-size IAM permissions
Originally published on Chaos to Control — DevSecOps blueprints for small teams.